



2 PCS Garden Stake Solar Lights Adjustable Landscape Ground Light

DESCRIPTION
Description:
Designed for gardens, lawns, flower beds, pathways, and landscape trees, this garden stake solar lights provides focused outdoor illumination without electrical wiring. Its compact head directs light toward tree trunks, shrubs, walls, architectural details, or decorative features, creating stronger contrast and depth after dark.Choose warm white for a relaxed, welcoming garden atmosphere or white light for clearer visibility and sharper landscape definition. The integrated 1W LED offers efficient accent lighting for residential outdoor spaces.A 180° adjustable structure allows the solar component to face available sunlight more effectively while helping position the light for different landscape features. The built-in 1800mAh battery stores solar energy collected during the day. Charging performance and nighttime runtime may vary with weather, season, sunlight, and installation location.Made from ABS and PC, the fixture carries an IP65 rating for dependable outdoor use. Its ground stake design supports quick, flexible placement around the yard.
Highlights:
180° Adjustable Design: This garden stake solar lights improves solar exposure and supports flexible light positioning.
Two Light Colors: Choose warm white or crisp white illumination.
1800mAh Battery: Stores daytime solar energy for nighttime landscape lighting.
Ground Stake Installation: Places easily near trees, lawns, paths, and flower beds.
IP65 Protection: Helps resist outdoor dust, rain, and changing weather.
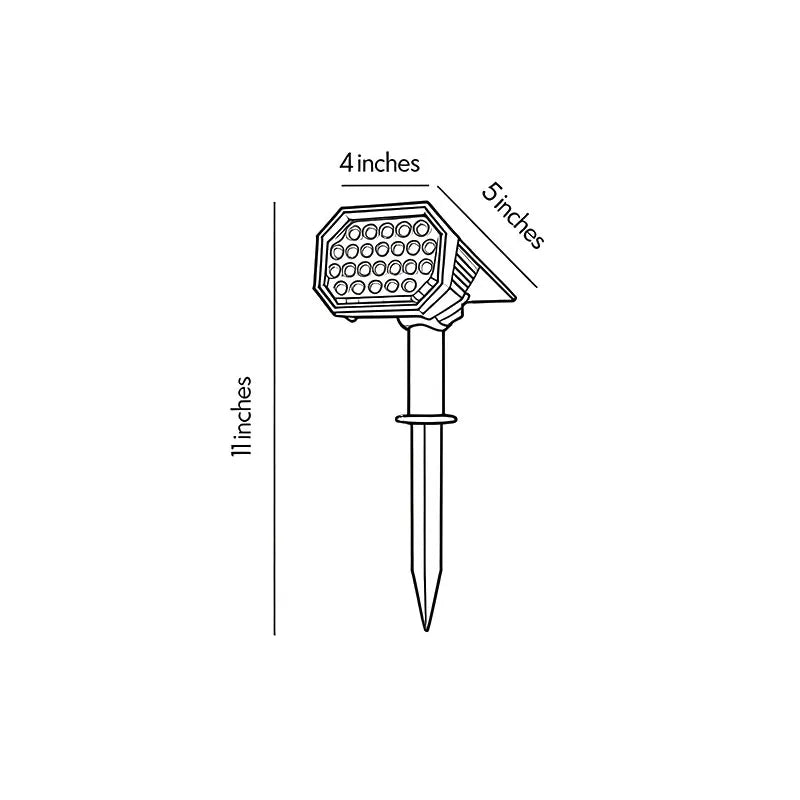
WEIGHTS & DIMENSIONS
| Color Temperature: Warm White (3000K) | |
| Weight: | 1.28lb |
| Size: | 4.02'' Width x 4.96'' Depth x 10.98'' Height |
| Color Temperature: White (6000K) | |
| Weight: | 1.28lb |
| Size: | 4.02'' Width x 4.96'' Depth x 10.98'' Height |
DETAILS
| Product Type: | Path Lights |
| Power Supply: | Solar |
| Power: | 1W |
| Style: | Modern |
| Light Source: | LED |
| Color Temperature: | Warm White (3000K),White (6000K) |
| Finish: | Black |
| Material: | ABS+PS |
| Control Type: | Push Button Switch,Solar Light Control |
| Mounting Type: | Ground |
| Ingress Protection: | IP65 |
| Indoor/Outdoor: | Outdoor |
| Product Care: | Turn Off the Power,Wipe Clean with Dry Cloth |
DEAL
Buy More Save More!
For purchases of 10 or more of the above items, please Contact Us for special offers.
Shipping & Delivery
Shipping & Delivery
Free Shipping
Dazuma offers free standard shipping on orders over $49. For orders under $49, a flat shipping fee of $9.99 will apply.
Processing Time
We start processing your order as soon as it is placed. You will receive an email confirmation upon placing your order. Please review your order details carefully for accuracy. Processing times are as follows:
- Standard Products: 7–10 business days.
- Custom or Bulk Orders: 10–35 business days.
- Peak Periods or Holidays: Processing times may extend during high-order volumes.
Shipping Methods & Delivery Times
Dazuma provides the following shipping options to suit your needs:
Standard Shipping
- Estimated Delivery Time: 15–25 business days.
- Cost: Free for orders over $49; $9.99 flat rate for orders under $49.
Expedited Shipping
- Estimated Delivery Time: 7–10 business days.
- Cost: Additional fees apply; calculated at checkout.
Note: Delivery times may vary depending on your location and carrier logistics.
Shipping Costs
Shipping costs are calculated based on:
- The shipping method you select.
- The weight and dimensions of your order.
- The delivery destination.
The total shipping cost will be displayed at checkout before completing your purchase.
Order Tracking
Once your order ships, you will receive an email that includes:
- A tracking number.
- A link to track your package.
- The carrier’s information (e.g., UPS, FedEx, DHL).
You can also track your order via our website on the Order Tracking page.
Shipping Delays
We strive to deliver your order on time; however, delays may occur due to:
- Inventory availability or processing capacity.
- High order volumes during peak seasons.
- Unforeseen circumstances such as natural disasters or strikes.
- Customs clearance issues or carrier delays.
If a significant delay occurs, we will notify you promptly. For urgent assistance, please contact Dazuma Customer Service.
Lost or Damaged Packages
Lost Packages
- If your package is not delivered within 15 business days of the expected delivery date, please contact us.
- We will work with the carrier to locate your package or provide a replacement/refund.
Damaged Packages
- If your package arrives damaged, please contact us within 48 hours of delivery.
- Provide photos or videos of the damaged item and packaging to expedite the resolution process.
Ownership & Authorized Online Operations
Dazuma is a lighting brand owned by DUSTERONE SARL, 44 Rue Beaurepaire, 49100 Angers, France.
Dazuma.us is an authorized online retail channel for Dazuma-branded products. HONGKONG GAOXUNBOO TECHNOLOGY CO., LIMITED is authorized by DUSTERONE SARL to support global e-commerce operations, including online store management, order processing, customer-service coordination, payment support, and logistics coordination for Dazuma.us.
Authorized U.S. Return & Exchange Receiving Facility
For approved returns and exchanges only:
Recipient: MH022 Address: 21 Central Ct STE #7, Leominster, MA 01453, United States
Please contact Dazuma Customer Support before sending any return or exchange shipment. Packages sent without prior authorization, missing order information, or sent to the wrong facility may be delayed, refused, or returned to sender.
Additional Information
- International Shipping: Available to select locations.
- Non-Serviceable Addresses: We cannot deliver to Alaska, Hawaii, P.O. Boxes, APO/FPO addresses, or restricted areas.
- Customs and Duties: All customs fees, import taxes, and duties are included in the shipping cost.
- Installation & Assembly: Dazuma does not provide on-site installation, assembly, indoor placement, or labor services.
- Non-Refundable Shipping Charges: Please note that shipping charges are non-refundable.
Return & Refunds
Return & Refunds
At Dazuma, we are committed to enhancing your home with thoughtfully designed lighting and home décor. While every order is rigorously inspected by our QA team before shipping, we understand that a return or refund may occasionally be necessary. This policy outlines the process for returns, refunds, and exchanges to ensure a seamless experience.
1. Order Cancellation Policy
Cancellation Before Shipping: You may cancel your order for a full refund at any time before the product has been shipped. Please contact us immediately at [email protected] to process your request.
Cancellation After Shipping: Once an order has been transferred to the carrier and is in transit, it cannot be canceled or modified. If you no longer wish to keep the item, please refer to our return policy after receiving the package.
Customized Orders: Once production of a custom or specialty order (non-stock sizes/designs) has begun, the order cannot be canceled or modified.
2. Return Window & Eligibility
Geographical Restriction: We only offer return and exchange services for orders delivered within the United States. We do not accept returns or exchanges from countries or regions outside the USA.
30-Day Strict Deadline: We offer a 30-day return window from the date of delivery. You must initiate your return request within this period. No returns or refund requests will be accepted after 30 days of receipt.
Condition Requirement: To be eligible for a return, items must be in their original condition: unused, unassembled, undamaged, and in their original packaging (unopened). All original tags, instructions, and inserts must be included.
3. Non-Returnable Products
The following items are strictly non-returnable and non-refundable:
Orders from outside the USA.
Customized or personalized items (unless there is a confirmed quality defect).
Items that have been assembled, used, or altered.
Clearance items, "Open Box" items, or final sale items.
Gift cards.
4. Return Shipping Costs
Quality Issues (Defective/Damaged/Mis-shipped): Dazuma will be responsible for the return shipping costs for orders that are defective, damaged, or mis-shipped. Please report such issues within 48 hours of delivery.If it is a quality issue, please contact [email protected] and provide photos/videos.
Non-Quality Issues (Change of Mind): For returns due to personal preference (e.g., style, size, or color), the customer is responsible for all round-trip shipping costs, including the original shipping cost paid by Dazuma and the return shipping fee.
5. How to Initiate a Return (USA Orders Only)
Contact Us: Email [email protected] with your order number and reason for return.
Approval: Once approved, you will receive the correct return address. Do not send items back without prior authorization.
Packaging: Securely package the item and include a note with your order number and product ID inside the box.
Tracking: Use a trackable shipping method. Dazuma is not responsible for lost or undelivered return packages.
6. Refund Process
Inspection: Once we receive and inspect your return, we will notify you of the approval or rejection.
Approved Refunds: Refunds will be issued to your original payment method within 5–10 business days.
7. Damaged or Defective Products
Visible Damage: If damage is visible upon delivery, please reject the shipment and contact us immediately.
Concealed Damage: If you discover damage after opening, you must contact us within 48 hours of delivery. Provide photos of the damaged item and all original packaging.
Dazuma will work with you to provide a replacement or refund, based on your preference.
8. 2-Year Quality Support & Warranty
We are committed to the longevity of your Dazuma lighting. To ensure your space remains perfectly lit, we provide a 2-year support framework for all fixtures:
Within 1 Year of Delivery: Should any functional issues or manufacturing defects arise (such as driver or LED failure), Dazuma will provide the necessary replacement components or a new unit at no additional cost to you.
Year 2 Support: For items entering their second year of use, our commitment continues through our Extended Loyalty Program. If a component requires replacement after the first 12 months, we offer exclusive, high-value discounts on replacement parts or new units to ensure your Dazuma collection remains in top condition.
How it works: If you have questions about your product's performance, simply reach out to [email protected]. Our technical team will review the details (please include your order number and any relevant photos) and provide the most efficient resolution for your specific case.
We strive to make returns, refunds, and exchanges simple and stress-free. For assistance, please contact Dazuma Customer Service.
9.The terms need to be explained:
If the return is caused by the consumer, consumer should be responsible for the shipping fee. The specific fee should be based on the express company you choose.
If due to our reasons, the goods received are damaged or not correct, and the consumer is not required to bear the shipping fee for this reason.
Authorized U.S. Return & Exchange Receiving Facility
For approved returns and exchanges only:
Recipient: MH022 Address: 21 Central Ct STE #7, Leominster, MA 01453, United States
Please contact Dazuma Customer Support before sending any return or exchange shipment. Packages sent without prior authorization, missing order information, or sent to the wrong facility may be delayed, refused, or returned to sender.
Ownership & Authorized Online Operations
Dazuma is a lighting brand owned by DUSTERONE SARL, 44 Rue Beaurepaire, 49100 Angers, France.
Dazuma.us is an authorized online retail channel for Dazuma-branded products. HONGKONG GAOXUNBOO TECHNOLOGY CO., LIMITED is authorized by DUSTERONE SARL to support global e-commerce operations, including online store management, order processing, customer-service coordination, payment support, and logistics coordination for Dazuma.us.
FAQ
FAQ
FAQs you need! Get instant answers to everything you want to know right here. Your questions answered in one convenient place.
Ordering & Payments
What Types of Credit Card Payments Do You Accept?
Dazuma accepts Visa, MasterCard, American Express, Discover, Diners Club, JCB, and UnionPay credit cards. Here is a list of Valid Payment Methods
What Should I Do If My Payment Method Is Declined at Checkout?
If your payment is declined, it may be due to factors such as incorrect billing details, insufficient funds, or fraud protection measures by your card issuer. Start by reviewing your card information for accuracy. If the issue persists, please contact Dazuma Customer Service for assistance.
How Will I Know My Order Has Been Received?
After placing your order, a confirmation page will display your transaction details. You can print this for your records. Additionally, a confirmation email will be sent to the email address provided. When your order ships, you’ll receive further emails with tracking information.
How Can I View an Order I’ve Placed?
Log into your Dazuma account and navigate to your Orders. If you’re unable to locate your order, please contact Dazuma Customer Service for help linking the order to your account.
Can I Change or Cancel My Order?
Once Dazuma receive your order, we begin processing it right away, so changes or cancellations may not always be possible. Additionally, orders cannot be modified online after they’ve been placed.
However, we understand that situations may arise where you’d like to request a change or cancellation. If this happens, please contact Dazuma Customer Service as soon as possible. We will do our best to accommodate your request.
If your order has already shipped before the cancellation or change is confirmed, you can return the item in accordance with our Return Policy. Please note that certain items, especially non-returnable ones, cannot be canceled.
Are Installation or Labor Costs Included in the Prices?
No, Dazuma is not responsible for installation or labor costs related to handling, storing, installing, or uninstalling items purchased from us.
Shipping & Delivery
Is Free Shipping Available?
Yes, Dazuma offers free standard shipping on orders over $49. Expedited delivery options are available at an additional cost.
How Much Does Shipping Cost?
Shipping costs are determined by the delivery location, the item's size and weight, and the selected shipping method. Exact fees will be calculated and shown during checkout. Additional surcharges may apply for deliveries to remote areas.
Are Customs Taxes Covered?
Dazuma covers all customs taxes for your orders. Whether you’re shopping locally or internationally, you can enjoy a seamless experience without worrying about unexpected customs fees.
How Long Will It Take for My Order to Arrive?
Delivery time includes both processing and shipping times:
1. Processing Time:
• Standard products: 7–10 business days.
• Custom or bulk orders: 10–35 business days.
• Processing may take longer during holidays or peak periods.
2. Shipping Time:
• Varies by location and shipping method.
• Expedited shipping: 7–10 business days (estimated).
• Standard shipping: 15–25 business days (estimated).
Delays may occur due to inventory availability, processing capacity, or unexpected events like strikes or natural disasters. If there are any delays, we will notify you promptly. For more details, visit Dazuma Shipping Info.
Why Didn’t I Receive an Email About My Order Delivery?
Once your order is dispatched, you’ll receive a tracking number via email within 1–2 business days. Please ensure your email address is accurate and check your spam folder if you don’t see the email.
How Can I Track My Package?
Visit the “Order Tracking” section on our website once your tracking number is updated by the courier. Note: Tracking updates may take time due to international shipping and customs clearance processes. Contact Dazuma Customer Service for help if you encounter any issues.
Can I Modify My Shipping Address?
You can contact Dazuma Customer Service to update your shipping address before the package ships. After shipment, address changes will not be possible.
Returns & Refunds
What Should I Do If I Receive a Damaged Item?
If your item arrives damaged, please follow these steps:
- Document the Damage: Take clear photos or videos of the damaged item, its packaging, and the shipping label.
- Contact Us: Email us at [email protected] with your order number and the photos attached.
- Resolution: After reviewing your case, we will arrange a refund or replacement at no additional cost.
How Do I Return a Product?
You can return eligible items within 30 days of delivery. Follow these steps to initiate a return:
1. Contact Customer Service: Reach out to Dazuma Customer Service to confirm the return address.
2. Package the Item: Retain all packaging materials and shipping notes. Securely pack the item and include a note with the following details:
- Order number
- Product ID or name and quantity
- A brief description of the issue with the product
3. Arrange Pickup: Make the package available for pickup as instructed.
4. Provide Tracking Information: Share the tracking number and a copy of the shipping receipt with Dazuma.
For more details, review our Return Policy.
How Is My Refund Calculated for Returns?
If you decide to return a returnable item because you’ve changed your mind, we will issue a partial refund. This refund will cover the cost of the item minus the original shipping fees. Additionally, you will be responsible for the return shipping costs.If the return is due to an item being damaged, defective, or incorrect, we will provide a full refund or a replacement at no charge. For further details, please refer to our
When Will I Receive My Refund?
Refunds are typically processed within one week after we receive and inspect the item. However, due to shipping, inspection, and banking processes, it may take up to 30 days for the refund to appear on your card.
Warranty & Support
Do Your Products Come With a Warranty?
Yes, Dazuma proudly stands behind the quality of our products. We offer a One-Year Warranty that covers defects in materials or workmanship. If you discover such a defect within one year of purchase, we will repair or, at our discretion, replace the product at no additional charge.Please note:
• The warranty does not cover defects, breakage, or malfunctions caused by mishandling or improper use of the product.
• Light bulbs included with the product are not covered under this warranty.
Who Should I Contact If I Have a Complaint?
Your satisfaction is our priority. Please contact Dazuma Customer Service via phone, live chat, or email, and we’ll do our best to resolve your concerns promptly.
Account Management
How Can I Update My Email Address?
Currently, email addresses cannot be updated. If you have no pending orders, contact Dazuma Customer Service to delete your account and create a new one with the updated email.
How Can I Update My Shipping Address?
Visit the “Profile-Address” section in My Account to add, update, or delete shipping addresses.
How Do I Unsubscribe From Emails?
Click the unsubscribe link at the bottom of any email and follow the instructions.
Promotions & Discounts
How Do Your Coupon Promotions Work?
To use a Dazuma coupon code, simply enter it during checkout. Once applied, your cart will reflect the discount associated with the code.Please keep in mind:
• They cannot be applied to special orders or previous purchases.
• Coupons cannot be combined with other discounts or markdown pricing.
• Each coupon is limited to one use per customer and is non-transferable.
• Coupons cannot be redeemed for cash or gift certificates.
Do You Offer Gift Cards?
Yes, Dazuma Gift Cards are available on our website and can be redeemed at checkout.
Custom Orders & Bulk Purchases
Can I Customize a Product?
While most items are sold as-is, we’re happy to explore customization options for bulk or special orders. Contact Dazuma Customer Service to discuss your requirements.
Do You Offer Discounts for Bulk Orders?
Yes, Dazuma offers special discounts for bulk purchases through our Trade Professionals Program, designed for qualified trade professionals such as designers, architects, and contractors.Key benefits include:
• Exclusive discounts on large orders.
• Personalized support from a dedicated trade account manager.
• Free and straightforward enrollment via our website.
If you need a quotation for a substantial purchase, our trade account managers are ready to assist. Contact Dazuma Customer Service and start saving on your next project!
Share this product


THE DAZUMA STANDARD

AUTHENTIC MATERIALS
Genuine natural silk, solid brass, and artisan glass.

QUALITY ASSURANCE
Rigorous 7-stage inspection for every fixture.

EXPERT SUPPORT
Provide online chat and email support services 24/7.

BESPOKE SOLUTIONS
Tailored dimensions and finishes for your specific needs.

7,000+ DESIGNS
Curated collections featuring the latest architectural trends.
Browse our selection of premium lighting, thoughtfully organized by the rooms they illuminate.


Discover our diverse aesthetics. Find the design language that speaks to your unique home décor.


Every material tells a story. From the cool touch of Stone to the warmth of Rattan, find the perfect finish to define your interior narrative.


Explore lighting optimized for specific zones—including indoor sanctuaries and outdoor landscapes.


Professional lighting support for residential and commercial projects, with project pricing, customization, and technical guidance from concept to installation.


What Makes These Garden Stake Solar Lights Different?
These garden stake solar lights are designed as compact, ground-mounted accent lights rather than tall pathway markers. The visible fixture combines a broad multi-LED face, a dark faceted housing, an adjustable pivot, a short cylindrical support, and a pointed stake. A tilted panel behind the lamp head appears positioned to collect sunlight while the front directs a concentrated beam toward planting, architecture, or another selected landscape feature.
The most important visual feature is the wide LED array. Instead of hiding one small light source behind a decorative diffuser, the rectangular face presents multiple individual lenses in organized rows. That layout gives the fixture a technical, purpose-driven appearance and suggests a broader illuminated field than a narrow single-diode garden marker. Actual brightness, beam angle, and lumen output must still be confirmed in the product specifications, because the number and appearance of visible lenses do not establish performance on their own.
A deep, angular rim surrounds the front face. This dark border gives the lamp head more definition during the day and may help visually separate the bright lens area from surrounding darkness at night. The housing is wider than the supporting stem, so the visual weight stays near the top while the narrow stake recedes into soil or mulch. That proportion is useful when the goal is to see the illuminated tree, wall, sculpture, or planting bed rather than a decorative post.
The pivot between the head and stem is another practical distinction. Based on the visible design, the lamp can be aimed rather than fixed in one upright position. This matters because a solar garden spotlight has two alignment jobs: its panel needs useful sun exposure, and its light needs to reach the intended subject without shining into windows or toward people. Verify the available tilt range and whether the panel and light head adjust together before ordering.
Compared with decorative lanterns or taller landscape path lights, this low-profile form is better suited to emphasis than continuous route marking. It can disappear among foliage by day, then reveal texture, height, and depth after dark. The black appearance also blends easily with dark soil, bark mulch, landscape edging, and shaded planting beds, although the listed finish and material should be checked on the product page.
Where Do Garden Stake Solar Lights Work Best?
Garden stake solar lights work best where a small ground-mounted fixture can receive direct daylight and aim light toward a specific subject after dark. Good applications include specimen trees, dense shrubs, textured masonry, house numbers, garden signs, ornamental grasses, and the edge of a planting bed. They are less effective where overhead shade blocks charging or where a low fixture would be buried by fast-growing plants.
Residential gardens and front yards
In a residential front yard, place the fixture outside the main viewing line and aim it back toward a tree canopy, stone facade, or architectural column. Lighting a surface from below can reveal bark, leaf movement, and masonry texture, but the beam should stop on the subject whenever possible. If light passes beyond it, it may create glare at a bedroom window or spill toward a neighbor. A controlled test after sunset is more reliable than aiming the head in daylight.
For a small flower bed, avoid positioning the lamp directly in front of the lowest seasonal plants. New growth can cover the lens, reduce the visible effect, and make cleaning difficult. Place it slightly behind the bed edge or in an open pocket between plants. The short stake should remain accessible enough to reposition as the garden changes through spring and summer.
Backyards, patios, and outdoor living areas
Near a patio, one or two fixtures can illuminate greenery beyond the seating area and make the yard feel deeper at night. Aim the beam away from chairs, dining positions, and doors. The goal is to create a softly lit background, not a bright source in the viewer’s field of vision. Pairing focused garden accents with low-output steps, sconces, or coordinated outdoor lighting usually produces a more comfortable result than relying on one intense layer.
Hospitality and shared landscape projects
For a boutique hotel courtyard, restaurant garden, or multi-unit residential entry, repeat the fixture selectively rather than placing one at every plant. Use it to identify important trees, signage, or vertical surfaces, while dedicated code-compliant lighting handles circulation and egress. Solar units can reduce the need for trenching in suitable locations, but a designer should still document sun exposure, seasonal shade, maintenance access, and expected overnight operating time before specifying many units.
How Should You Aim and Space a Solar Garden Spotlight?
Aim a solar garden spotlight so the brightest part of its beam lands on the intended feature while the light source stays outside normal sightlines. Begin close to the subject with a steeper upward angle, then move the fixture back if the illuminated area is too narrow. Spacing should follow the size and rhythm of the landscape rather than a single fixed measurement, because beam angle and brightness are unknown.
For a small shrub or address plaque, a relatively close position may keep the beam contained. A mature tree, wide stone wall, or tall column generally needs more setback so the light can spread across a larger area. Increasing distance usually enlarges the lit field but reduces intensity on the surface. Because the exact optic is not provided, test one unit at night before establishing a repeated layout.
Do not automatically point the lamp straight up the center of every tree. A slight side angle often reveals more texture and creates visible shadow, especially on sculptural trunks or layered foliage. Two lights from different sides can soften severe contrast on a large feature, but using too many may flatten the scene. One well-aimed beam is often more effective than a symmetrical row of bright spots.
When illuminating a wall, keep the fixture far enough away that the beam does not create a tiny, harsh patch at the base. Moving it outward can produce a broader gradient, while moving it closer emphasizes surface relief. Check the result from the primary approach, the front door, and indoor windows. A layout that looks attractive from the sidewalk may expose a bright lens from the living room.
Use restraint along walkways. The pictured product is visually closer to the fixtures in an outdoor spotlight collection than to a shielded path marker. If used beside a route, aim it at planting or a wall rather than toward walkers. Dedicated path lighting is usually the better layer for consistent ground-level guidance because its distribution is designed around the walking surface.
Professional tip: mark proposed locations with temporary stakes, then observe them between midday and late afternoon to compare solar exposure. Return after dark with a portable flashlight to test beam direction and sightlines. This simple two-stage study catches conflicts between charging position and nighttime aiming before holes, mulch, or planting make repeated changes inconvenient.
Solar Exposure, Nighttime Output, and Seasonal Performance
Reliable solar lighting depends first on the panel’s access to useful daylight, not simply on whether the garden feels bright. Place the panel where buildings, fences, tree canopies, and dense foliage do not shade it for long periods. Nighttime output may vary with charging conditions, battery capacity, operating mode, temperature, and age, so confirm the stated run time and charging guidance in the specifications.
The rear panel appears tilted upward, but its exact adjustment range is not visible. If the light head and panel move as one assembly, aiming the beam may also change the panel angle. In that case, the best location is a compromise: enough sunlight during the day and a useful beam after dark. If they adjust independently, positioning becomes easier. Verify this mechanical detail before planning a tightly constrained installation.
Open south- or west-facing planting beds often receive stronger afternoon exposure in many U.S. locations, but orientation alone does not guarantee charging. Rooflines, neighboring buildings, deciduous trees, and seasonal sun angles can change the result. Watch the proposed spot across a full clear day. A location that receives sun in July may sit in long shade during winter when the sun is lower.
Weather also affects expectations. Several cloudy days can reduce the stored energy available for nighttime use, even if the fixture performs well after a clear day. Cold conditions may affect battery behavior, and accumulated snow, pollen, dust, or leaves can cover the panel. The product page should be checked for the listed operating range, weather rating, battery details, and care instructions rather than assuming all outdoor solar lights perform identically.
For a project that requires dependable all-night illumination, safety lighting, or guaranteed brightness, solar accent lights should not be the sole layer unless their documented performance meets the requirement. Hardwired fixtures or other dedicated systems may be more appropriate for critical areas. Use this product primarily where adaptable, cable-free landscape emphasis is the main objective.
How to Build a Balanced Landscape Lighting Plan
A balanced landscape plan assigns different fixtures different jobs. Use these stake-mounted solar lights for focal trees, planting, masonry, or signs; use shielded path fixtures for walking surfaces; and use wall or overhead lighting at doors and work areas. Keeping each layer moderate creates depth and visual order, while asking one bright fixture type to handle every task often produces glare, dark gaps, and uneven coverage.
Begin with the view from inside the home. Choose one or two landscape features that remain visible through important windows, then light those features as the farthest layer. Next, address the transition between the house and garden with porch lights, sconces, or low path markers. Finally, add only the accent lights needed to connect the composition. This inside-out approach keeps the garden from becoming a random collection of bright objects.
Color appearance matters even when the precise color temperature is unknown. If the existing porch and path lights have a warm appearance, a noticeably cooler garden spotlight can make the planting feel separate or overly stark. Review the listed color temperature and compare it with nearby fixtures before purchasing multiples. Matching every source exactly is not always necessary, but large differences are easy to notice on one facade or planting bed.
Use brighter, more concentrated accents sparingly. The broad visible LED array suggests that this fixture is intended to project rather than glow decoratively, but actual output must be verified. For a large canopy or tall wall, compare the product’s documented beam and brightness with purpose-built outdoor flood lights. A compact solar unit may be visually effective on a small feature yet insufficient for a wide architectural elevation.
Repeated units should create hierarchy. For example, place the strongest emphasis on the specimen tree near an entry, use softer accents on two supporting shrubs, and leave some areas dark. Darkness is not a failure in landscape design; it provides contrast and gives the eye a place to rest. Equally bright fixtures at equal intervals can make a natural garden look more like a parking perimeter.
Professional tip: photograph the completed scene from the street, the main entrance, and the most-used interior window. Cameras exaggerate some bright spots but make imbalance easy to identify. If one fixture dominates every view, lower its output if an operating mode allows, widen the aiming angle, move it farther from the subject, or remove it from the composition.
Are These Garden Stake Solar Lights Right for Your Project?
These lights are best suited to users who want a compact, adjustable, cable-free accent for a sunny garden location. They make sense for highlighting individual plants, small trees, textured walls, landscape signs, and architectural details. They are not the strongest choice for deeply shaded beds, guaranteed all-night security lighting, or routes that require uniform illumination and verified safety performance.
Before ordering, measure the available open area around the proposed stake location. Check whether the lamp head can clear edging, groundcover, irrigation lines, and mature plant growth. Review the listed overall height, head width, panel dimensions, tilt range, and required insertion depth. A product can look compact in a studio image but still conflict with a narrow bed or disappear behind dense foliage.
Confirm the technical information that cannot be established from the image: lumen output, beam angle, available modes, charging time, expected run time, battery type, weather rating, operating temperature, color temperature, and any automatic dusk-to-dawn behavior. Also verify whether the battery can be replaced and whether the light and panel adjust independently. These details determine whether a solar landscape spotlight fits the intended use more than its daytime appearance does.
- Choose it for: movable accent lighting, sunny planting beds, small focal trees, facade texture, garden signs, and low-disruption landscape updates.
- Reconsider it for: heavily shaded locations, loose or waterlogged soil, areas exposed to frequent impact, critical security coverage, or uniform pathway lighting.
- Measure first: visible head clearance, stake depth, distance to the subject, mature plant spread, and the area of direct sun available to the panel.
- Verify before purchase: output, beam, modes, run time, charging guidance, weather suitability, battery care, controls, and mounting instructions.
Installation should also account for underground conditions. Do not push a stake into an area without considering irrigation tubing, low-voltage cable, drainage components, root systems, or utility lines. Follow the supplied instructions and use an appropriate pilot opening if recommended. For hard clay, gravel, or compacted ground, forcing the stem can damage the product even when the pointed end appears robust.
Frequently Asked Questions
Are garden stake solar lights the same as solar path lights?
No. Garden stake solar lights can describe several ground-inserted products, but the pictured design functions more like an adjustable spotlight. Its wide multi-lens face is meant to aim toward a selected feature. Solar path lights usually distribute lower, softer light across a walking surface and often use a taller post or shielded head. For safe route lighting, choose a fixture with documented distribution and output for that purpose rather than relying on an upward-aimed accent light.
What can I highlight with this type of solar garden spotlight?
Good subjects include small specimen trees, ornamental grasses, dense shrubs, stone walls, columns, house numbers, garden signs, and sculptures. Choose one feature with enough texture or shape to benefit from directional light. Avoid aiming through sparse branches toward windows, roads, or neighboring property. Because the exact beam angle is unknown, start with one fixture and test the result after dark before purchasing a full set.
How far should the light be placed from a tree or wall?
There is no universal distance because the best setback depends on beam angle, brightness, subject height, and the effect you want. A close position produces a smaller, more intense patch and stronger texture. Moving the light away generally broadens the illuminated area and reduces intensity. Begin close, then move back in small increments during an evening test. Keep the lens outside normal sightlines and make sure the beam finishes on the intended surface whenever possible.
How much direct sunlight does the solar panel need?
Use the charging recommendation stated on the product page, since panel efficiency and battery capacity vary. In practice, the proposed location should receive substantial unobstructed daylight without long shadows from roofs, fences, trees, or nearby buildings. Observe the site across the day rather than judging it once. Clean the panel periodically, and remember that winter sun angles, cloudy weather, foliage, snow, or debris may reduce nighttime operating time.
Will this fixture stay on all night?
That cannot be confirmed from the image. Operating time depends on the documented battery capacity, charging conditions, light output, selected mode, temperature, and battery age. Review the listed run-time range and the conditions used to establish it. If all-night operation is essential, do not rely on an assumed solar performance level. Consider a hardwired or otherwise documented lighting layer for critical security, access, and circulation needs.
Can I install the stake in mulch, lawn, or compacted soil?
Mulch and ordinary garden soil may be suitable if they support the stake firmly, but surface appearance can be misleading. Loose mulch over shallow soil may allow the head to lean, while hard clay or gravel may resist insertion. Check the required stake depth and installation instructions. Avoid forcing the unit, and identify irrigation components, landscape wiring, roots, and buried utilities before making an opening. Recheck stability after heavy rain, freeze-thaw cycles, or landscape maintenance.
How do I prevent glare from a multi-LED solar spotlight?
Keep the bright face below eye level and outside the direct view from paths, seats, doors, and windows. Aim the fixture so the beam lands on foliage or a solid surface rather than passing beyond it. A slight side angle can reveal texture without pointing the lens at viewers. If output modes are available, begin with the lower setting. Reassess from the street and from inside the home because glare may only appear from certain positions.
What maintenance do garden stake solar lights require?
Wipe the solar panel and lens using the method recommended by the manufacturer, remove leaves or snow that block charging, and trim plants that cover the light face. Check the stake after storms, irrigation work, or seasonal soil movement. Periodically review operating time for signs of declining battery performance. Before replacing a battery, opening the housing, or using a cleaner, confirm that the product is designed for that procedure and follow the listed care instructions.


