Who This Is For: This guide is for homeowners who cook for a crowd, use the kitchen island as both a work surface and gathering place, or find that their kitchen feels dim by late afternoon in fall and winter.
Introduction
By late fall, the kitchen can be fully occupied well after daylight has faded. One person chops vegetables at the perimeter counter, another checks food in the oven, and guests gather at the island just as a hot pan needs a clear landing spot. A kitchen that seems adequately bright on a sunny weekend may reveal deep shadows during a holiday dinner.
Useful kitchen lighting follows the work, then changes with the gathering. It makes knife work and stovetop checks easy to see, shows food naturally at the buffet, and gives guests a comfortable place to talk after prep is done. You do not need every light at full power all evening. You need the right surfaces illuminated and controls that let the room shift without interrupting the host.

The Quick Answer: Light the Worktop Before the Ceiling
Begin with the places hands and hot dishes go: the main prep counter, sink, range, island, serving station, and the route between them. Give counters direct, even light, often from under-cabinet fixtures where upper cabinets exist. Use recessed or other ceiling lights to support the open parts of the room, then use pendants over the island when they suit its size and sightlines. Put these layers on separate switches or compatible dimmers whenever practical.
For a welcoming residential kitchen, warm to moderately warm white light around 2700K to 3500K can work, with many households preferring a consistent 3000K appearance across visible layers. The exact choice matters less than seeing ingredients clearly and avoiding a jarring shift from cool work lights to an amber island. Test the actual lamps against your countertops, cabinetry, and food in the evening.
If you are planning a refresh, browse kitchen lighting with a sketch of your work surfaces rather than a count of ceiling fixtures. The most decorative lamp in the room should not be expected to illuminate every cutting board.
Map the Kitchen as It Functions on a Hosting Day
Draw the everyday layout, then add holiday equipment: a temporary beverage station, slow cooker, dessert tray, extra cutting board, and the place where guests set down coats or packages. Mark the surfaces used for precise work, the places where people wait or chat, and the route from the oven to the serving area. This reveals needs that a standard kitchen plan can miss.
Find the Shadow Your Body Creates
Turn on the existing lights after sunset and stand at the counter as you would while cutting. If the main ceiling light is behind you, your head and shoulders may cast a shadow across the knife and board. Moving a lamp to a higher setting will brighten the room without necessarily fixing the counter. Task lighting mounted beneath the upper cabinet reaches the work surface from in front of you.
Plan for More Than One Cook
A second person may work at the island while you use the range. Lighting only the most attractive side of the kitchen can leave that helper in a dim zone. Test simultaneous use at the sink, prep area, and island. One person should not have to turn off another person's task light to make the gathering area comfortable.
Where guests stand, the priority changes. They need enough light to identify drinks, snacks, and the path around the island, but a glaring pendant at seated eye level can make conversation unpleasant. Separate the prep surface from the social zone in your lighting plan even when both happen on the same countertop.

Follow the Food's Route
Imagine taking a hot roasting pan from the oven to a clear counter and then carrying food to the dining table. The path, landing surface, and serving utensils must remain visible even if the island pendants have been dimmed for guests. This simple walkthrough often uncovers a dark corner that a static floor plan misses.
Keep portable lamps and their cords away from wet counters, heat, and traffic. Permanent electrical changes should follow the fixture instructions and applicable local requirements.
Give Each Work Surface the Light It Needs
Perimeter Counters
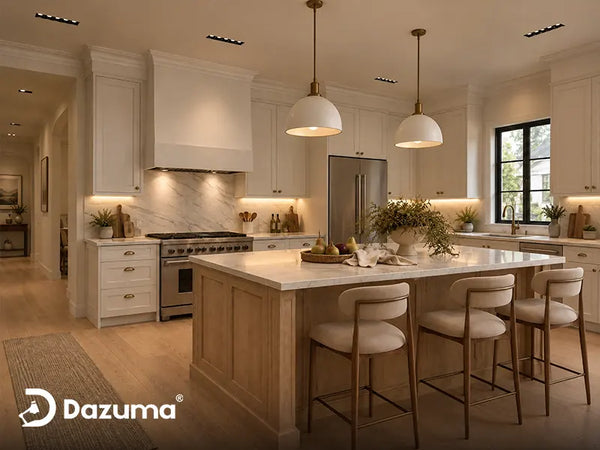
Upper cabinets create a useful mounting point but also block ceiling light. A continuous or thoughtfully spaced under-cabinet source can illuminate the front half of the counter where hands often work. Check for a bright dotted reflection in polished stone or tile; diffusers and placement can soften the appearance. The light should reach the cutting surface rather than only wash the backsplash.
If adding permanent lighting is outside the current project, first clean existing lenses, replace failed bulbs with suitable ones, and verify that the switch operates the lights you expect. An interim, properly rated portable task light may help in an appropriate dry location, but do not drape cords across a prep path or sink.
Sink and Window
The window that makes dishwashing pleasant in daylight becomes dark glass at night. A ceiling light behind the person at the sink can cast their hands into shadow; a bright pendant in the window can create a reflection that competes with the view. Test light from the sides or above the work area and look at the glass after sunset. The goal is a clear sink basin and counter edge, with no naked lamp mirrored at eye level.
Range and Oven
Check the range hood's built-in light first. It should make the pans and controls readable without forcing the whole ceiling to full brightness. The oven door and the counter used for hot pans deserve their own visibility check. Avoid placing decorations or temporary lighting where heat, steam, or cooking grease will affect them. Follow appliance and fixture instructions for clearances.
Ceiling lighting can fill gaps between these task areas, but an evenly spaced grid is not necessarily a useful layout. For a deeper placement plan, see how to plan kitchen recessed lighting around counters, cabinets, beams, and controls. The key during hosting is to make the working surface visible from the cook's actual position.
Check the Cutting Board, Not Just the Room
Place a cutting board at the spot used most often and stand there with a knife safely set down. Look at the board and your hands under the normal evening setting. If your body blocks ceiling light, an under-cabinet layer will often solve the problem more directly than increasing general brightness.
Repeat the test at the counter where a second cook will work. Holiday prep tends to spread beyond the kitchen's everyday favorite spot.

Make Island Lighting Work for Prep, Serving, and Conversation
The island's job can change several times in one afternoon. It may begin as a second prep station, become a place to arrange appetizers, then turn into a spot where guests lean and talk. A pendant can define the island beautifully, but check its beam and height while people use all three positions. A focused shade may make a bright circle at the center while leaving the far end dark.
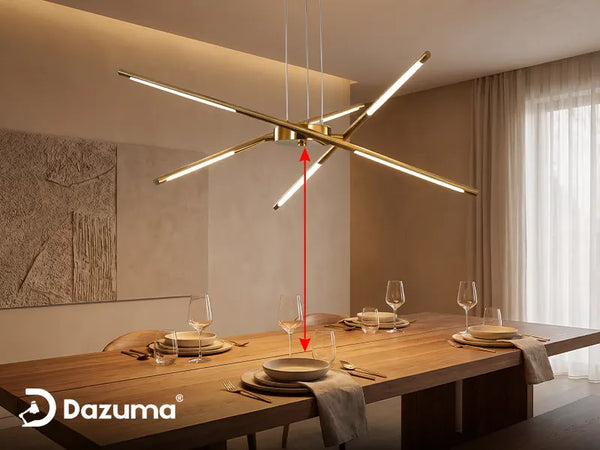
For many standard-height islands, placing the pendant's bottom roughly 30 to 36 inches above the countertop is a starting point. Fixture size, ceiling height, seated and standing sightlines, and the manufacturer's hanging range can change the answer. Do not use the number mechanically: a long, low fixture that interrupts a face-to-face conversation or protrudes beyond the island needs a different arrangement. For the detailed measurement, refer to the kitchen island pendant height guide.
Shades influence the feeling of the whole kitchen. An opaque downward shade can keep the island focused but may need other ceiling light for the walkway. A translucent or glass shade can spread more light but expose bulbs from certain seats. If shopping pendant lighting, compare how the fixture appears from the stools and from the cook's side, not just in a front-facing product photo.
Leave a Real Landing Spot
During holiday hosting, food often lands on the island before it reaches the table. Keep the part used for hot dishes well lit and clear of tall centerpieces, bottles, or arrangements that cast a shadow. A pendant that looks excellent above a bare island may illuminate only a decorative display once platters and guests fill the space. Test with a tray and a person standing at each end.

See It From a Stool
At standing height, a pendant may appear pleasantly above the work. From a stool, its bulb or reflected image in a glossy counter may sit directly in the eyes. Test the lowest and highest planned dimmer levels from every usual seat.
A diffuse shade and separate counter task lighting can let the pendant set the mood after prep without asking it to do every job at once.
Separate Controls Make a Busy Kitchen Easier to Use
If all fixtures share one switch, the kitchen has one lighting scene: everything on or everything off. Separate circuits or compatible smart controls can give practical choices. A common arrangement is one control for counter task lights, one for general ceiling lights, and one for island pendants. The range hood usually has its own control. This lets a cook keep a clear board while the rest of the room softens for guests.
A dimmer is useful only if the bulb or integrated LED and its driver support that control. Check the manufacturer's compatibility guidance. A fixture described as adjustable color temperature may change from warm to cool without changing brightness, so read those features separately. Test the lowest useful setting before the holiday; flicker or a sudden drop to darkness is a reason to review compatibility, not to accept a frustrating scene.
Controls should be simple enough for someone who has not memorized the kitchen. If you use multiple switches, label them discreetly or practice the two or three settings you will need. The objective is a quick shift from preparation to gathering, then back to full working light for cleanup.
Choose Useful Brightness and Coherent Light Color
There is no single lumen number that fits every kitchen. A dark countertop absorbs more light than a pale one; a frosted diffuser distributes light differently from a narrow spotlight. Even a large total lamp output can leave the board in shadow when sources are behind the cook. Check the surface, contrast, and glare at the actual work position before buying higher-output bulbs.
Color temperature is the appearance of white light, measured in kelvins. Around 2700K looks warmer; 3000K remains warm but often feels crisp enough for a mixed-use kitchen; 3500K can look more neutral for tasks. These are choices, not safety thresholds. Choose a comfortable baseline across layers visible together. A strongly cool strip under the cabinets next to very warm island pendants can make the same food look different as it moves across the room.
Food appearance also depends on color rendering, not just the Kelvin number. Compare bulbs or fixtures under real conditions: leafy greens, roasted vegetables, a white plate, and a person's face. If a new light makes one color seem dull or unnatural, review its color quality and distribution. A warm lamp with poor rendering will not necessarily flatter dinner.
For a smaller kitchen without an island, flush mount ceiling lights can provide general illumination without dropping into sightlines. They still benefit from a separate task layer at the counter. Choose based on room scale and the way the light leaves the fixture, not only the silhouette against the ceiling.
A Simple Lighting Plan for the Hosting Timeline
| Moment | Light to Prioritize | Check From the Room |
|---|---|---|
| Early prep | Counter, sink, and range task lights; comfortable general light | Boards, hands, and appliance controls are clear |
| Guests arrive | Island and serving station plus visible walkways | Food is inviting; bulbs do not glare into seated eyes |
| Dinner moves out | Lower general light; keep active worktops lit | The kitchen feels calm but a cook can still work |
| Dessert and cleanup | Serving surface, sink, and counters as needed | Glassware and spills are easy to see |
The table is a practical script rather than a required technology setup. Manual switches can produce the same effect. Decide who will change the lights, and when, so guests do not spend the whole evening under preparation-level brightness.
Let the Kitchen Settle After Dinner
In an open-plan home, a fully illuminated kitchen can dominate the dining or living room long after cooking ends. Lower the general ceiling layer, leave a gentle island glow, and keep a practical task light available for anyone returning for dessert or tea. The kitchen remains connected to the gathering without looking like an active work zone.
Restore brighter light when clearing food and washing dishes. A pleasant scene should never make spills or sharp objects difficult to see.

A Before-Guests Kitchen Lighting Checklist
- Set up the kitchen as it will be used, including extra appliances, trays, and a clear place for hot dishes.
- Wait until after sunset and test the prep board, sink, stove, oven landing area, island, and beverage station.
- Stand where each cook will stand; look for shadows made by bodies, cabinet doors, and tall decorations.
- Sit at island stools and look for bare bulbs or reflections at eye level.
- Compare the color of food and a white plate under adjacent lighting layers.
- Walk the route from oven to serving surface with an empty tray and check for cords or dark transitions.
- Practice preparation, guests-arrive, and after-dinner settings on the actual switches or controls.
- Confirm that full practical brightness can be restored quickly for cleanup.
Final Advice
Fall and holiday hosting reveal the difference between a bright kitchen and a useful one. Start at the cutting board and other work surfaces, give the island a comfortable role for both food and conversation, and let separate controls change the atmosphere through the evening. A short test after dark can show where a small task layer or aim adjustment matters more than an entirely new ceiling layout.
When the lights support both the cook and the guests, the kitchen can feel busy without feeling harsh. People see the food, find a place to help, and linger comfortably once the last pan leaves the stove.