Who This Is For: This guide is for homeowners who want to uplight one or more trees and are deciding between a nearly invisible in-ground fixture and an adjustable spotlight before committing to excavation, wiring, or a solar layout.
Lighting a tree is less about making the yard brighter and more about revealing structure. A good beam catches the texture of the trunk, separates major branches, and lets some leaves glow without flattening the entire canopy. The fixture that produces that effect may be a recessed well light or an above-ground spotlight, but the two solve different practical problems.
Well lights disappear into the ground and create a clean architectural look. Spotlights remain visible, yet they are easier to aim, relocate, and service. For most existing residential yards, an adjustable spotlight is the more forgiving choice. A well light becomes the better design move when hidden hardware is a priority and the site can support proper drainage, safe excavation, and permanent placement.

Quick Answer: Which Is Better for Lighting Trees?
Choose spotlights for most trees when you need precise aiming, want to test different positions, expect the canopy to grow, or prefer easier maintenance. A narrow or medium controlled beam can start several feet from the trunk and travel through the branching structure. The head can be tilted again after pruning or seasonal growth changes the composition.
Choose well lights when the fixture must visually disappear, the viewing area is close to the ground, and you have a stable permanent location with suitable drainage. They work especially well in formal courtyards, tree wells within paving, and lawns where an above-ground head would interrupt the design. Their main limitation is that aiming and relocation are usually less convenient.
The strongest result is sometimes a combination: one hidden uplight adds drama at the trunk while a second, offset spotlight reaches outer branches. Avoid assuming that more fixtures automatically look better. One carefully aimed light with intentional shadows often looks more natural than three beams that erase all depth.
Well Lights vs Spotlights: The Practical Difference
| Decision Factor | Well Light | Spotlight |
|---|---|---|
| Appearance by day | Nearly flush and visually quiet | Head, stake, or base remains visible |
| Aiming | Fixed or limited, depending on the fixture | Usually easy to tilt and redirect |
| Installation | Requires a recess, drainage, and careful connections | Stake, base, or surface mounting is simpler |
| Adjustment as the tree grows | More difficult to move | Easy to re-aim or relocate |
| Water management | Critical because the fixture sits in a low point | Still important, but the head is above grade |
| Best fit | Permanent, minimal, integrated landscapes | Flexible tree aiming and retrofit projects |

One Hides; the Other Adapts
The cleanest daytime landscape usually favors a recessed fixture. The most adaptable nighttime composition usually favors a spotlight. Decide which matters more before comparing wattage or finish.
When Well Lights Are the Better Choice
Browse well lights when you want the source to disappear and the light to seem as though it rises from the landscape. That effect suits sculptural trunks, clipped formal trees, stone courtyards, and projects where every visible fixture competes with a carefully planned hardscape.
A recessed light also removes the projecting head that can catch a hose, mower, pet leash, or foot. That does not mean every well light is drive-over or mower-safe. Load rating, lens temperature, trim height, and installation surface must be confirmed for the exact fixture. A light rated for outdoor water exposure is not automatically rated for vehicle loads.
Well lights are less forgiving when the original position is wrong. A fixed beam directly against the trunk can create a bright hot spot below and darkness above. If the tree grows away from the beam, changing the composition may require reopening the ground. Mock up the effect at night with a portable light before cutting concrete, drilling pavers, or disturbing soil.
The compact recessed set below is better understood as a low-level paver and marker system than as a powerful single-tree uplight. Sixteen 0.6W points can outline a tree bed, reveal the lower trunk, and connect the tree to a path. The product page does not list lumens or beam angle, so it should not be presented as a proven solution for throwing light through a tall canopy.

In-Ground Paver Lights Waterproof Recessed Lights
Price: $175.99 for the 16-piece option
A discreet system for tracing the edge of a tree well, step, deck, or path while adding gentle light around the tree's base.
- Stainless steel bodies and PC lenses suit recessed outdoor placement.
- The small 0.91-inch width keeps each visible point understated.
- Multiple points can connect tree accent lighting with safer path guidance.
When Spotlights Are the Better Choice
For a tree rather than a paving pattern, outdoor spotlights usually offer more control. You can move the source away from the trunk, aim diagonally through the main branch structure, and shield the lamp from the primary viewing direction. If a new limb creates glare or a dense summer canopy blocks the beam, correction may take only a few minutes.
This adjustability matters because trees are not static architecture. Leaves appear and fall, branches are pruned, trunks widen, and surrounding shrubs mature. A position that looks balanced in the first year may feel low or off-center in the third. Ground stakes are particularly useful during the design phase because you can test several offsets before committing to permanent wiring or a base.
Light Across the Tree, Not Straight Up Its Center
A slight side angle usually reveals bark and branch depth better than a beam placed tight against the trunk. It also helps keep the brightest part of the beam out of windows and viewers' eyes.

A solar spotlight is appealing where trenching is undesirable, but tree shade creates an obvious design conflict: the light belongs near the tree while the solar panel needs direct sun. Review solar spotlight options only after observing the proposed charging location through the day. Winter sun angles and leaf-out can reduce exposure even when the location looks sunny in early spring.
The adjustable solar model below has independently movable lamp and panel angles, a useful feature when the best beam direction differs from the best sun direction. Its page lists a five-hour direct-sun charge and about ten hours of operation, but real-world runtime can vary with weather, season, mode, panel cleanliness, and battery condition. IP54 is suitable for outdoor exposure as listed, yet it offers less water-ingress protection than the IP67 recessed set, so avoid placing it in a low area that holds water.
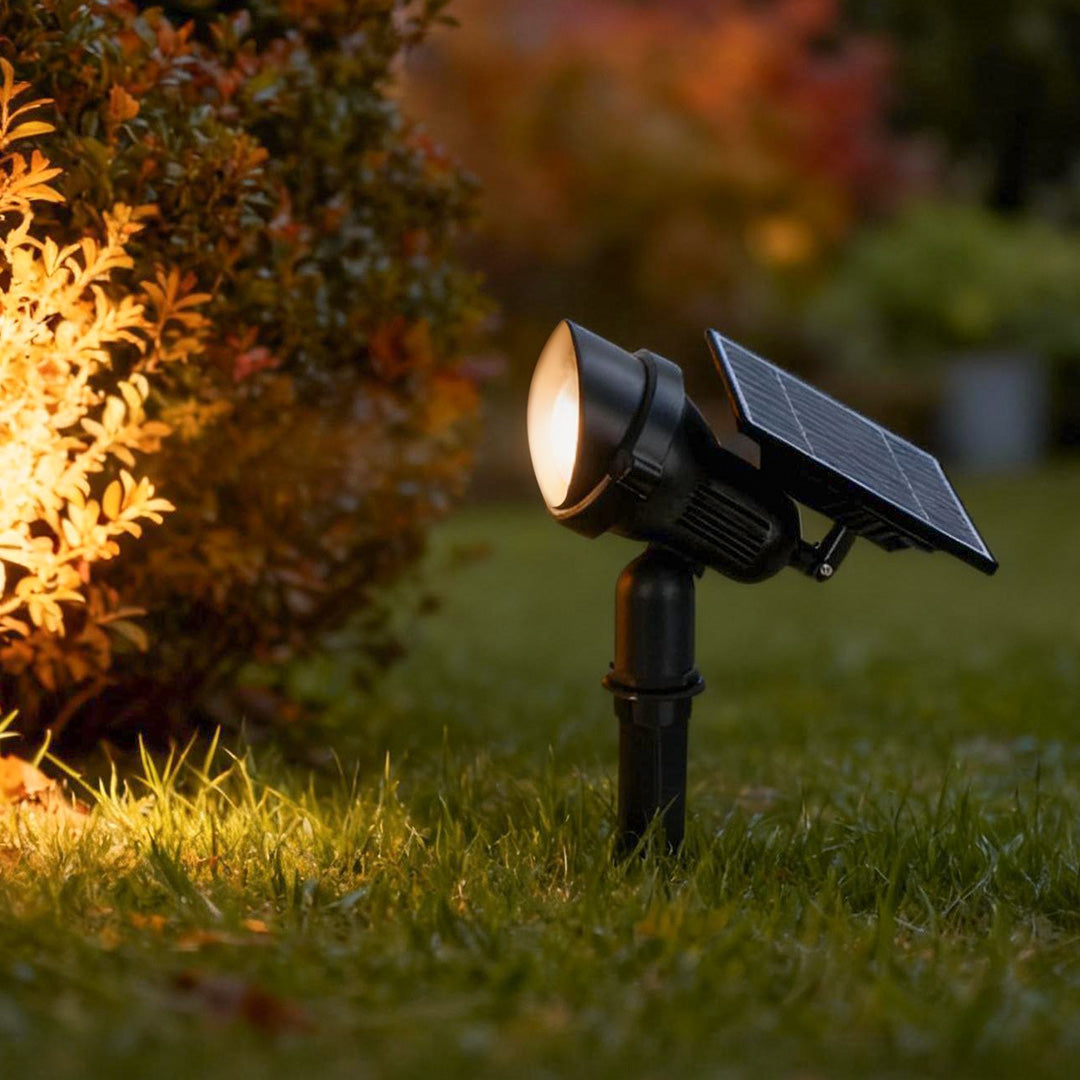
Lawn Spot Lights Outdoor Adjustable Solar Tree Light
Price: $109.99 for the one-piece option
An aimable, wire-free option for homeowners who can give the solar panel direct sun while directing the lamp toward a tree, shrub grouping, or facade.
- Separate lamp and panel adjustment supports better aiming and charging.
- Ground-insert and base-mounted versions suit soil or firm surfaces.
- An automatic light sensor handles everyday dusk-to-dawn operation.
Match the Fixture and Beam to the Tree
Tree size alone does not determine the answer. Form matters just as much. A narrow columnar tree needs a different beam than a wide Japanese maple, and an open winter silhouette behaves differently from a dense evergreen. The product pages for both featured fixtures do not publish lumen output or beam angle, so do not promise a specific canopy reach from wattage alone. Request photometric information when available or test one fixture before buying a large quantity.
| Tree Situation | Useful Starting Approach | Main Risk to Check |
|---|---|---|
| Small ornamental tree | One low-output, carefully shielded uplight | Overlighting delicate foliage |
| Wide, layered canopy | Two offset spotlights at different angles | Flat, shadowless illumination |
| Tall mature tree | Controlled, longer-throw spotlights tested on site | Beam ending halfway up the canopy |
| Tree in formal paving | Recessed well light with planned drainage | Standing water and inaccessible service |
| Tree in deep shade | Wired light or a remotely sunny solar-panel position | Insufficient solar charging |
For more composition ideas, the guide on how to use uplighting for trees and landscaping explains how beam direction changes the way trunks, leaves, and background layers read after dark.
Placement and Aiming: Start With the Nighttime View
Begin at the place from which the tree will be seen most often: the living room, patio, driveway approach, or street. Keep the fixture itself and the brightest part of the beam outside that sightline. Then move the temporary light around the tree rather than automatically placing it on the house-facing side.
As a starting test, place an adjustable light roughly two to six feet from a small or medium tree and aim across the trunk into the branch structure. This is a mock-up range, not a universal installation formula. A narrow tree may need less offset; a broad canopy or powerful narrow beam may need more. Step back to the main viewpoint after each adjustment. The correct position is the one that reveals form without sending glare through a window or beyond the property.

Use Darkness as Part of the Design
Do not chase perfectly even coverage. Dark gaps between branches create depth, and a slightly off-center beam often makes the tree feel more dimensional than a front-facing wash.
A mature tree may need two beams, but vary their roles. Let one establish the trunk and principal branches while the second reaches a broader side of the crown at lower intensity. If both beams are identical and symmetrical, the tree can look staged. The article Master Outdoor Spotlights: A Professional Landscape Lighting Guide offers a broader framework for beam placement around landscapes and architecture.
Drainage, Tree Roots, Power, and Maintenance
Do Not Treat an IP Rating as a Drainage Plan
An IP67 well light offers stronger water-ingress protection than an IP54 spotlight, but neither rating means the fixture should sit indefinitely in a clogged hole. Recessed installations need a base and surrounding material that allow water to move away, plus accessible, outdoor-rated connections. Keep mulch, leaves, soil, and lawn clippings from covering the lens. If water collects in the proposed recess after rain, solve that condition before installing the light.
Protect the Tree While Excavating
Tree roots often extend far beyond the visible canopy. Do not cut large roots to force a housing, conduit, or trench into a preferred visual line. Shift the fixture, use hand excavation where appropriate, and consult a qualified arborist when work approaches significant roots on a valuable mature tree. Also leave room for trunk flare and future growth; a recessed ring placed tightly around a young trunk can become an obstacle later.
Choose Power Based on Reliability, Not Convenience Alone
Low-voltage wired lighting usually provides more predictable nightly performance and can connect multiple fixtures to one controlled system. Solar avoids cable runs but depends on direct sun and battery health. Look across the larger outdoor lighting plan before mixing systems: consistent color temperature and switching can matter more to the final view than having every fixture use the same body style.
Plan for Seasonal Service
Spotlights need re-aiming as plants grow; well lights need lenses and drainage paths cleared; solar panels need unobstructed sun. Place every fixture where routine care can happen without damaging plants.

For permanent 120V connections, hardscape cutting, or any installation that raises questions about local electrical rules, hire a licensed electrician or qualified landscape-lighting professional. Verify transformer capacity, cable size, connection method, and any required protection for the actual system rather than assuming the fixture's low-voltage output makes every part of the installation a casual DIY project.
Common Mistakes When Lighting Trees
Choosing From Wattage Without Beam Information
Wattage describes electrical demand, not how far or wide useful light travels. Optics, lumen output, mounting distance, foliage density, and ambient light all affect the result. When lumens and beam angle are not listed, test a sample rather than extrapolating from watts.
Putting Every Fixture Tight Against the Trunk
This creates an intense base and weak upper branches. Pull an aimable spotlight back and cross the trunk at an angle. If a well light must sit close, choose optics designed for the intended throw and confirm the effect with a nighttime mock-up.
Ignoring Glare From Indoor Viewpoints
A beautiful tree from the patio can become an exposed LED from the sofa. Walk every main sightline after dark, including neighboring-facing directions, and add shielding or change the angle until the source disappears.
Expecting Solar to Work Under a Dense Canopy
A solar fixture can be well aimed and still perform poorly if its panel is shaded. Observe direct sun over several hours, clean the panel periodically, and account for shorter winter days. Use wired lighting where reliable nightly output matters more than avoiding trenching.
Installing Once and Never Revisiting the Scene
Check the design after leaf-out, pruning, and a full season of growth. Re-aim spotlights, uncover well-light lenses, remove debris, and make sure no fixture has become buried or crowded. Outdoor lighting is a living composition because the landscape around it keeps changing.
Final Advice: Pick Control or Concealment
For most homeowners lighting an existing tree, spotlights are the better first choice. They make it easier to find the right beam path, respond to growth, manage glare, and service the fixture. Choose a well light when the cleanest possible daytime landscape is worth a more permanent installation and the site has the drainage, access, and root clearance to support it.
For the two products featured here, the adjustable solar spotlight is the more direct tree-lighting tool, provided its panel receives adequate sun. The recessed paver-light set is better for marking a tree bed, illuminating the lower trunk, and visually connecting the tree to a deck, step, or path. Neither should be selected for a tall canopy based on watts alone because the pages do not state lumens or beam angles.
Mock up the scene after dark before buying the full system. Start with one warm, controlled beam; step back to the real viewing position; protect the roots; and keep the source out of sight. The best tree lighting does not announce the fixture—it makes the tree itself feel quietly present after sunset.