Who This Is For: This guide is for homeowners who want their garden to look inviting from the patio, the street, and the windows after dark. It is especially useful if you have collected a few attractive lights but are unsure where they should go together.
Introduction
A garden can look wonderful at dusk and strangely flat an hour later. Often the problem is not a lack of fixtures. Every light is doing the same thing: making a bright dot along an edge. Meanwhile, the tree, textured wall, and seating area that give the garden its character disappear into darkness.
Decorative garden lighting works better when you arrange views, not rows of products. Give the eye a foreground, a middle distance, and one gentle point of interest farther away. Let a path remain readable, then decide which plant, structure, or gathering spot deserves attention. The dark space between these moments is part of the composition.

Start With the Nighttime View
Stand Where You Actually Look at the Garden
Before buying or staking anything in place, stand at the kitchen window, the patio door, and the seat you use most. Take a photo from each point at dusk and again after full darkness. Those two times can produce surprisingly different results: a fixture that looks subtle against the remaining sky may become the brightest object in your view once the background disappears.
Choose one focal point visible from at least one of those positions. It might be a branching tree, a fountain, a wall with interesting texture, or a cluster of tall grasses. You do not need to illuminate every bed. In a small yard, one focal point may be enough; in a deep yard, a second, quieter point can pull the eye beyond the patio. If every ornament is equally bright, none feels special.
Trace the Route Before Decorating It
Now walk from the door to the gate, seating area, or shed. Mark each turn, step, uneven patch, and junction. The route needs to be understandable before the decorative layer is added. A whimsical lantern in a flowerbed can make the garden charming, but it should not be the only source revealing a change in level. For more detail on that distinction, see Dazuma's guide to lighting a garden path without overdoing it.
A useful planning trick is to sketch two lines on a photo: the line your feet follow and the line your eyes follow. The first helps you place guidance light at turns and transitions. The second helps you place a distant highlight so the garden still looks composed when no one is walking through it. The two lines need not be lit in the same way.
Give Each Light a Job
Rather than deciding that every fixture must match, assign each one a role. Dazuma's Garden Lights collection includes pathway forms as well as wall, post, lantern, and tree-accent styles; the shape alone does not tell you where a particular variant belongs. Check its mounting, power, and light direction before planning the arrangement.
| Lighting Job | Best Location | What You Want to See | What to Avoid |
|---|---|---|---|
| Guide | Path entrance, bend, junction, or step approach | The route and changes in direction | A bright dotted runway with dark paving between dots |
| Reveal | Selected tree, shrub, sculpture, or wall | Shape, texture, and depth | Light aimed into a window or a neighbor's yard |
| Gather | Patio, bench, or dining corner | Faces, food, and the nearby floor comfortably | Bare bulbs at seated eye level |
| Decorate | One border or quiet corner | A small playful or sculptural detail | Too many competing novelty pieces |
One light can sometimes serve two roles. A softly lit planter beside a path can define both the edge of a bed and the direction of travel. But if a decorative fixture lights itself more than the ground, treat it as an accent, not as proof that a step or route is safely illuminated.
Arrange Lights by Garden Area
Paths: Light the Decisions, Not Every Inch
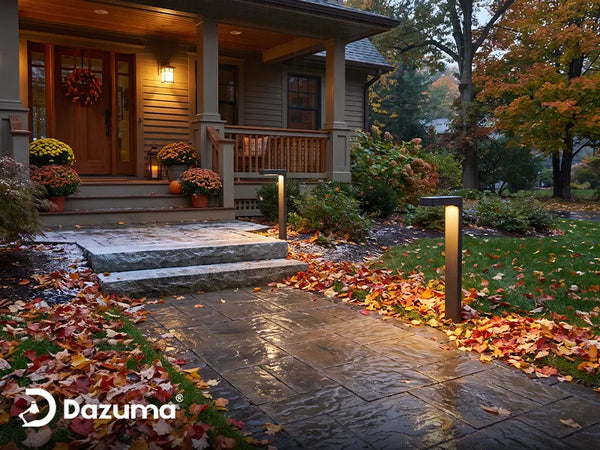
Start with the first few feet outside the door, then put temporary lights near a bend, junction, and destination. On a simple straight route, stagger selected fixtures from side to side if their beams reach the walking surface. On a narrow path, one side may be calmer and easier to maintain. Move each fixture until its light pool helps you read the paving without shining into your eyes as you approach.
There is no spacing number that works for all gardens. Height, output, beam shape, paving color, and nearby wall light all affect what you see. Test two or three units at night before ordering a full run. The path lights collection gives you forms to compare, but your actual walking surface should decide the final position.

Follow the Curve
A turn is a better reason for a light than an arbitrary measurement on a plan. Test the scene from both walking directions, then move fixtures until the next section of path is clear.
Planting Beds: Use Repetition Sparingly
Along a long border, pick one visual rhythm: perhaps two understated garden fixtures near the front and a stronger highlight toward the far end. Repeating identical decorative shapes every few feet can make a planting bed resemble a store display. Leave pockets of darkness so leaves and branches create silhouettes. You can also tuck a fixture just behind low foliage, provided the plant will not grow over the light or block maintenance access.
If the border borders a lawn used by children or pets, consider the physical position as carefully as the glow. Keep fixtures clear of mower routes, hose lines, and the space needed for trimming. Avoid placing a fragile ornament where a gate swings or where guests step off the path. In a windy area, confirm that portable pieces are stable and used according to their product instructions.
Trees and Walls: Choose One Surface to Reveal
A single accent aimed into a tree canopy can give a small garden height; gentle light across a wall can make a narrow garden feel deeper. The choice depends on the view. If the tree has interesting branching, test a focused fixture from several positions. If the foliage is dense but a brick wall has texture, a restrained wash across the wall may offer more detail. Explore outdoor spotlights for adjustable accents, then confirm the exact fixture's beam, power, and mounting before buying.
Stand at the sidewalk, neighboring property line, and upstairs windows while aiming. A light that feels dramatic from the patio may send glare toward a bedroom or into the sky. Aim and shield it so the intended plant or surface receives the light. If the effect cannot be contained, choose a different target or a softer, lower fixture.
Give the Eye a Destination
From the patio, a softly defined tree or textured wall can finish the view. Keep the foreground quieter so the distant detail remains noticeable without becoming a spotlight show.

Seating Areas: Make the Space Comfortable to Use
For a bench, choose a nearby low source that shows the approach and a softer light behind or beside the seat. On a patio, a lantern or wall-mounted fixture may provide the welcoming layer, while a separate task source helps when people eat or read. The glow of a decorative object by itself may look lovely in a photograph yet leave faces and the table in shadow.
Keep visible bulbs away from seated sightlines. Sit down, lean back, and look in the direction people will talk. If you see the bright source instead of the garden, shift or shield it. When a seating area is beside the house, outdoor wall lighting can provide a stable background layer, leaving small decorative garden fixtures free to add character.
Test Spacing, Balance, and Glare
Use Uneven Visual Weight
Good balance does not require matching pairs. A broad, softly lit tree on one side may visually balance two small lanterns on the other. Arrange by the size and brightness of the lit areas, not just the number of fixtures. Step back: if one tiny lamp is glaring while the larger planting disappears, the small lamp is carrying too much visual weight.
Try switching off every other decorative fixture. If the garden becomes calmer and still works, leave some out. This test is especially helpful with patterned solar stakes or color-changing pieces, whose glowing shades may attract more attention than their surroundings. Keep a consistent general color impression across permanent lights; save a strong color effect for a deliberate occasion or one contained focal point.
Check From Three Heights
Look from standing height while walking, seated height on the patio, and the higher position of an upstairs window. A low fixture can be well shielded for a walker but expose its lamp to someone looking down from the house. Likewise, a wall light that flatters masonry from the lawn may be uncomfortable from the dining table behind the glass.
Move or aim the source until the lit surface, not the lamp, is what you notice. If moving it cannot solve the problem, a shielded or lower-output design may fit better. These observations matter more than a claim that a specific shape is universally glare-free.

Let Darkness Separate the Scenes
Small unlit intervals give the garden depth. They also help you notice whether each illuminated spot has a purpose rather than filling every empty patch with a fixture.
Plan Power and Weather Exposure
Choose the power method after you know what each area needs. Solar can make a movable decorative accent easy to try, but performance depends on sun exposure and season. A shaded bed beneath a tree may be the very place where an integrated solar panel charges poorly. A wired low-voltage system can support a more consistent planned run when installed with compatible components; line-voltage products and new outdoor circuits require appropriate electrical installation. Do not infer the power type from a fixture's appearance.
For portable pieces, check whether they are intended for open rain or only a sheltered location. For any fixed light, review the exact product and variant for outdoor suitability, mounting, voltage, connectors, and installation instructions. A word such as “garden” in a title is not a substitute for checking those details. Keep cords out of foot traffic and away from sharp edging or irrigation work. If the project needs new line-voltage wiring, an outdoor outlet, or changes to a circuit, use a qualified electrician.
Controls can protect the look as well as save operating time. Let the path or entry layer run when people need to move through the yard; let decorative accents turn off later when no one is enjoying the view. A dusk sensor, timer, or compatible smart control may suit different fixtures. Check the product's actual control method before assuming it will share a schedule with another light. For a fuller distinction among outdoor zones, Dazuma's outdoor lighting zone guide offers a useful companion plan.
Try Three Practical Layouts
A Small Courtyard Seen From the Living Room
Begin with one soft wall or tree accent at the far boundary. Add a light at the step from the house and one restrained decorative piece near a planter. Stand indoors and check the reflection in the glass: if the near fixture turns into a bright mirror image, move it off the direct sightline or reduce its intensity. A courtyard can feel larger when the far edge is visible and the center remains relatively quiet.
A Curved Path Through Planting
Mark the start, bend, and endpoint with temporary lights. Add a fixture only where the walking surface becomes unclear. A modest highlight on a distinctive shrub near the end creates a destination without lining the entire bed. If the path includes steps, give those changes in level their own visibility test. In a more architectural garden, selected bollard lights may help define a wider route, but check their height and spread against the scale of the plants.
A Backyard With a Patio and a Single Tree
Let the patio provide the practical light for gathering. Use a gentle tree accent beyond it and a few low cues along the route back to the door. If you add a decorative lantern near the chair, keep its glow below the importance of the patio task light and the tree. From the kitchen window, the result should read as three linked moments: a comfortable seat, a clear route, and an inviting distant feature.

Make the Final Nighttime Check
Test the arrangement after dark before setting permanent stakes or mounts. Walk every route in both directions. Sit in the chairs. Look out from the main windows. Confirm that steps and turns are visible, that the focal point is easy to identify, and that no source shines into a face, a bedroom, or a neighbor's window. Then repeat the check after plants grow or the season changes.
Take one photograph from your most important viewpoint and compare it with the plan. If the image shows only bright bulbs, adjust aiming or reduce the number of fixtures. If it shows the path, a gentle focal point, and a place you would like to sit, the arrangement is doing its job. The best decorative garden lights make the landscape feel present after sunset while leaving enough darkness for the garden to feel like a garden.