Who This Is For: This guide is for U.S. homeowners who want their outdoor spaces to feel intentional, functional, and welcoming after dark. Whether you have a large backyard or a modest front yard, zoned lighting helps every area work harder and look better.
Key Takeaways
- Why Outdoor Zones Matter
- Zone 1 – Entry and Front Walkway
- Zone 2 – Patio and Outdoor Living Area
- Zone 3 – Garden Beds and Landscape Features
- Zone 4 – Pathways and Side Yards
- Zone 5 – Perimeter and Security Layer
- How to Plan Your Outdoor Lighting Zones
- Color Temperature Guide for Each Zone
- Recommended Products
- Build Your Outdoor Zone Plan
Why Outdoor Zones Matter

Most homeowners light their yards tame way they did a generation ago — one bright floodlight by the garage and maybe a porch light. It gets the job done, but it does not make the space feel lived in.
Zoned outdoor lighting is a completely different approach. Instead of one catch-all light source, you treat each part of your yard as its own space with its own purpose. The entry feels welcoming. The patio feels relaxed. The garden beds feel curated. The pathways feel safe.
The result is a yard that looks professionally designed and functions well for everything from quiet eveningscan improve home security without looking like a surveillance setup.
This guide walks through the five core outdoor zones most homes have, the right fixtures for each, and how to put a practical lighting plan together.
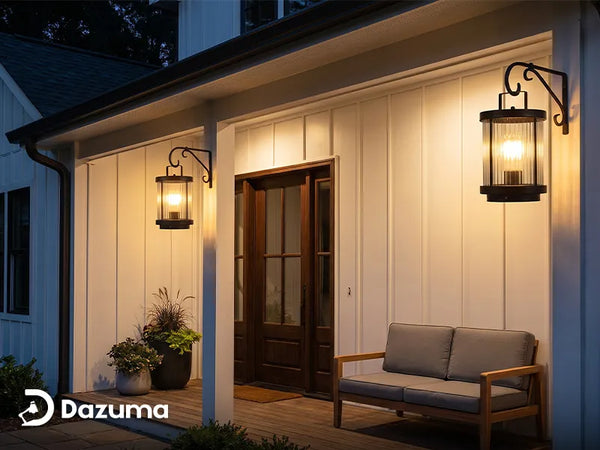
Zone 1 – Entry and Front Walkway

First Impressions Start Here
The entry zone sets the tone for everything else. It covers your front door, porch, and the walkway leading up to it. Lighting here serves three purposes: safety, curb appeal, and a sense of welcome.
Wall sconces flanking the front door anchor the entry. Pair them with low-profile Path Lights or bollard lights along the walkway to guide guests safely from the sidewalk to your door.
Keep color temperature in the 2700K–3000K range here. Warm white feels inviting rather than institutional. Avoid anything above 4000K at the entry — it tends to read as cold and unwelcoming.
Placement Tips
- Space pathway lights 6–8 feet apart for even coverage without over-lighting
- Mount wall sconces at roughly 66–72 inches above the ground
- Use fixtures with downward-facing light to reduce glare for approaching guests
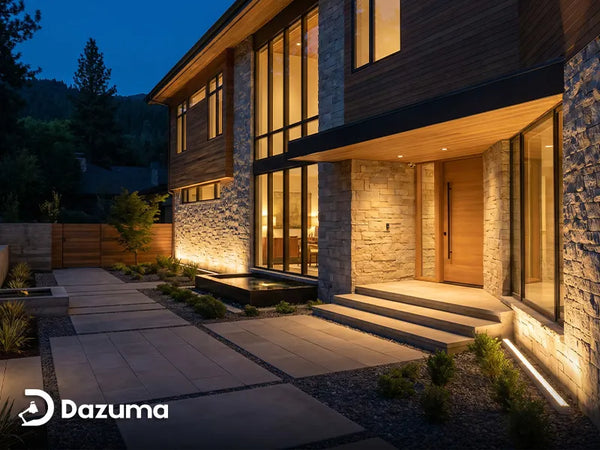
Zone 2 – Patio and Outdoor Living Area
Your Outdoor Living Room
The patio zone is where people actually spend time — dining, relaxing, entertaining. Lighting here needs to be layered. A single overhead fixture creates flat, unflattering light that kills the mood.
Start with an anchor source like a pendant or flush-mount ceiling light if you have a covered patio. Then layer in string lights or wall-mounted fixtures at eye level to create warmth. Add ground-level accent lights around planters or steps to fill in the bottom layer.
For open patios without overhead structure, Outdoor Wall Lighting mounted to the house or a nearby fence works well as the primary source. Combine with portable lanterns or solar stake lights for flexibility.
What To Watch
- Avoid pointing any fixture directly at seating areas — bounce light off walls or downward
- Dimmable fixtures make a big difference here; adjust brightness for dinner vs. late-night conversation
- Waterproof rating of at least IP44 required; IP65 preferred for open patios exposed to rain

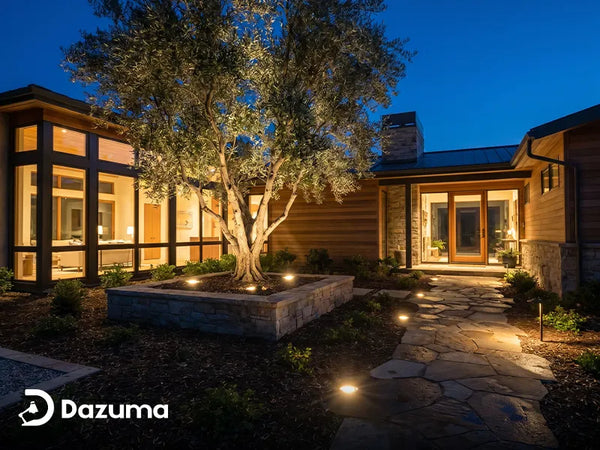
Zone 3 – Garden Beds and Landscape Features
Make Your Landscaping Work at Night
Most homeowners spend real money on plants, shrubs, and garden design — and then let all of it disappear the moment the sun goes down. Garden zone lighting fixes that.
The two main techniques here are uplighting and path-edge accenting. Uplighting places a fixture at the base of a tree or large shrub and angles light upward, creating dramatic silhouettes. Path-edge accenting uses low bollards or stake lights along the border of a garden bed to define its shape without overpowering the plants themselves.
If you want to highlight a specific focal point — a Japanese maple, a fountain, a sculpture — a narrow-beam spotlight gives you precise control. For broader coverage across a mixed border, low-output bollard lights spaced evenly do the job without creating hotspots.
Check out Best Outdoor Landscape Lighting for Gardens for a deeper planning guide on garden zone setups.
Common Mistakes
- Over-lighting — not every plant needs its own fixture; let some areas fade naturally
- Using the wrong beam angle — wide flood lights wash out detail; use narrow spots for uplighting
- Placing fixtures too close to plants — heat and moisture can damage roots over time
Zone 4 – Pathways and Side Yards

Safety and Flow Between Zones
Pathways and side yards are the connective tissue of your outdoor layout. They rarely get design attention, but poor lighting here is one of the most common causes of tripping hazards and security blind spots.
Bollard lights are the go-to fixture for this zone. Their cylindrical profile distributes light evenly at knee-to-waist height, which is exactly where you need it for safe footing. They define the path without creating glare, and their vertical form adds a clean visual structure to an otherwise plain side yard.
For longer runs, space bollards 8–10 feet apart. For tighter turns or steps, close the gap to 4–6 feet. Solar bollards work well here if running wire is impractical, though low-voltage wired systems give more consistent output.
For more ideas on this fixture type, see Path Bollard Lighting Ideas to Brighten Your Landscape Design.
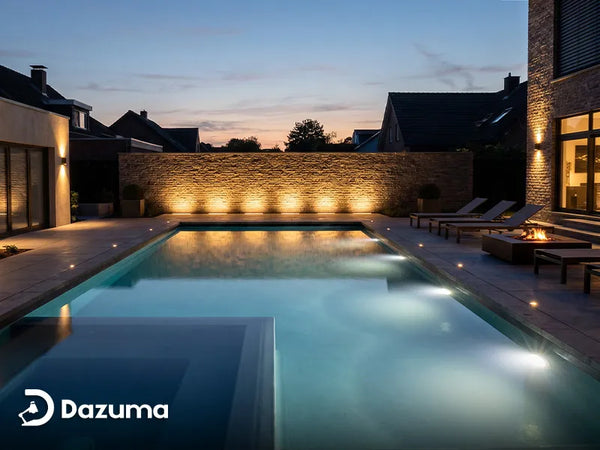
Zone 5 – Perimeter and Security Layer
Protect the Edges Without Ruining the Mood
The perimeter zone covers your fence line, driveway, garage, and any dark corners around the property. Its primary job is security and visibility, but that does not mean it has to look industrial.
Motion-activated Outdoor Wall Lights are the most practical choice here. They stay off until triggered, which saves energy and actually makes the activation more effective as a deterrent. Pair them with always-on low-level lighting along the fence base so the yard never goes completely dark.
For driveways, post lights or bollard lights along the edge give definition and make it easier to park without sacrificing the overall aesthetic. Keep color temperature slightly cooler here — 3000K to 3500K — for better visibility without making the space feel harsh.
| Perimeter Area | Recommended Fixture | Key Feature |
|---|---|---|
| Garage / Driveway | Wall sconce or post light | Wide beam, motion sensor optional |
| Fence Line | Low bollard or stake light | Always-on, low output |
| Dark Corners | Motion-activated flood or wall light | Triggered on movement |
| Back Gate | Compact wall mount | Downward-facing, IP65 |
How to Plan Your Outdoor Lighting Zones
Step 1: Sketch Your Yard
You do not need a professional drawing. A rough overhead sketch on paper showing your house footprint, driveway, pathways, garden beds, patio, and fence line is enough. Mark each area and label it as one of the five zones.
Step 2: Prioritize by Use
Which zones do you actually use most? Start with the entry and patio — they deliver the most immediate impact. Add pathway and garden lighting next. Perimeter lighting can come last since it is mostly functional.
Step 3: Choose Your Power Method
Low-voltage wired systems (12V) are the most reliable for landscape lighting. Solar is convenient for zones where running wire is impractical, but performance varies by season and location. Line-voltage fixtures (120V) are best for permanent wall mounts and security lights.
Step 4: Match Fixtures to Zones
Use the zone descriptions above as your guide. Avoid mixing very different color temperatures across adjacent zones — a jump from 2700K on the patio to 5000K on the pathway will feel jarring. Stay within a 500K range across connected zones.
Step 5: Test Before You Commit
Before running any wire, place fixtures temporarily with extension cords or battery-powered test lights at night. Walk the property. Adjust positions. It is much easier to move a stake than to re-route buried cable.
Color Temperature Guide for Each Zone
| Zone | Recommended CCT | Why It Works |
|---|---|---|
| Entry / Front Walkway | 2700K – 3000K | Warm and welcoming, flatters most home exteriors |
| Patio / Living Area | 2700K – 3000K | Relaxed ambiance, good for dining and entertaining |
| Garden Beds | 3000K – 3500K | Enhances green foliage, brings out natural color |
| Pathways / Side Yards | 3000K – 3500K | Clear visibility without harsh contrast |
| Perimeter / Security | 3000K – 4000K | Better visibility for security without being clinical |
Waterproof Ratings: Quick Reference
| IP Rating | Protection Level | Best For |
|---|---|---|
| IP44 | Splash resistant | Covered patios, protected entries |
| IP65 | Dust-tight, water jet resistant | Open patios, pathways, garden beds |
| IP67 | Submersion up to 1 meter | Ground-level fixtures, wet areas |
Recommended Products

Cylinder LED Black Outdoor Landscape Bollard Light
Best For: Pathways, garden bed borders, and side yard definition
| Style | Modern Cylinder |
| Light Source | LED |
| Finish | Black |
| Application | Outdoor Landscape |

Dazuma Outdoor Landscape Light (TLI00305)
Best For: Accent lighting in garden zones and defined outdoor living areas
| Light Source | LED |
| Application | Outdoor / Landscape |
| Install Location | Garden, Pathway, Yard |
Build Your Outdoor Zone Plan
Creating distinct outdoor zones with lighting does not require a massive budget or a professional installer. It requires a clear plan, the right fixtures for each area, and a willingness to test before you commit. Start with the entry and patio, then work outward zone by zone.
Explore Dazuma's full range of outdoor fixtures to find what fits each zone in your yard: Path Lights, Outdoor Wall Lighting, Outdoor Solar Lights, and Outdoor Lighting.