Who This Is For: This guide is for homeowners, contractors, and landscape designers who want to add wall washer lighting to a home's exterior — whether you're working with stone, brick, stucco, or wood siding and want a professional-grade result.
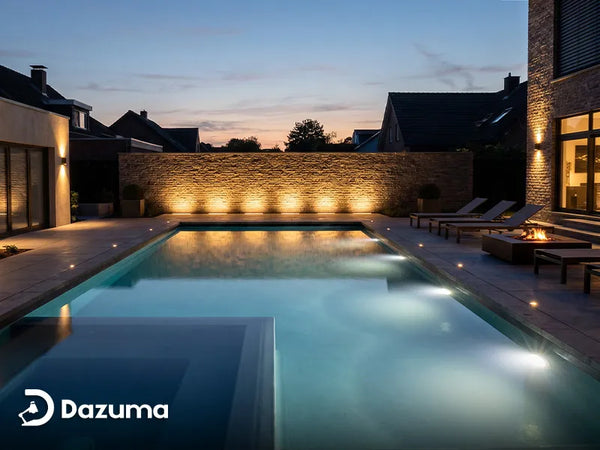
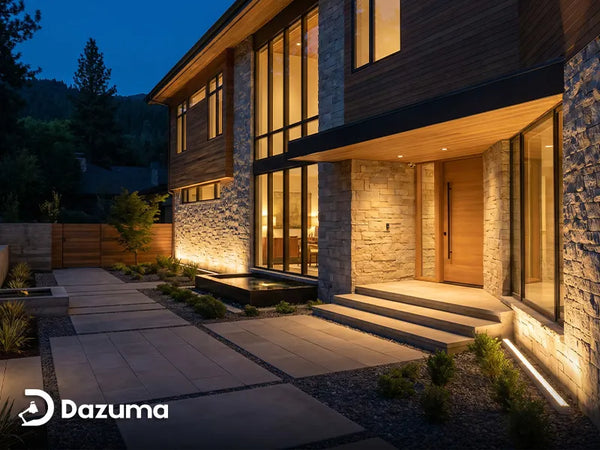
There's a moment — usually around dusk on a warm evening — when you pull into your driveway and something is different about your neighbor's house. The stone facade glows. Every ridge and furrow catches the light. The front of their home looks like it belongs in an architectural magazine. Chances are, the difference is wall washer lighting.
Wall washers are one of the most underused tools in residential exterior lighting. Done right, they don't just illuminate — they sculpt. They pull texture out of flat surfaces, add vertical drama to modest facades, and give any home a presence after dark that daylight alone can never achieve. And unlike elaborate landscape lighting projects, installing wall washers on an exterior facade is well within reach for a skilled DIYer or a single-trade contractor.
This guide walks you through the entire process: understanding the fixture type, planning your layout, mounting at the right height and distance, running weatherproof wiring, and avoiding the common mistakes that leave installations looking flat or amateurish. Whether you're working on a new build or retrofitting an existing exterior, you'll leave with a clear plan and the confidence to execute it.

What Are Wall Washer Lights?
Wall washer lights are fixtures specifically engineered to project light across a vertical surface — a wall, facade, or architectural element — in a smooth, even gradient. Instead of a tight beam aimed at a single point, a wall washer spreads light broadly across the face of the surface, creating the signature "washed" look that reveals material texture and adds visual depth.
There are two primary types used in exterior applications:
- Linear wall washers: Long, low-profile fixtures mounted at ground level or along a wall's base. They project light upward and outward across the facade in a wide, asymmetric spread. These are the workhorses of architectural facade lighting — ideal for long stretches of stone, brick, or stucco where consistent coverage matters.
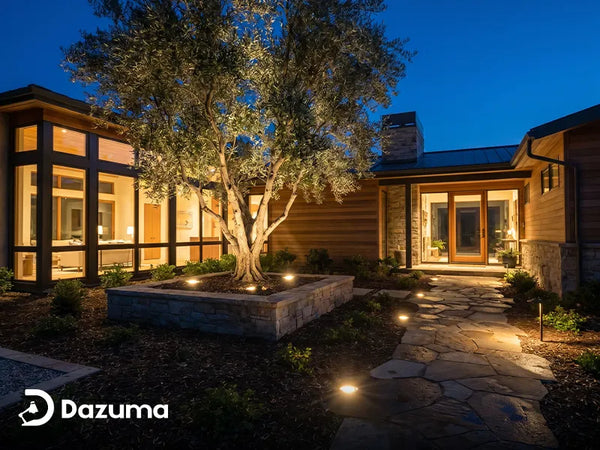
- Adjustable accent wall washers: More compact, directional fixtures that can be angled and aimed. These offer flexibility for non-uniform walls, arched entries, or areas where you want more controlled placement without committing to a full linear run.
The purpose goes well beyond aesthetics. Wall washers increase the perceived height of a building by drawing the eye upward. On textured surfaces like cut stone or handmade brick, grazing light from a close-mounted wall washer creates dramatic shadow play that makes the material itself the visual feature. On smooth stucco or concrete, a wider, softer wash adds warmth and presence without harsh contrast.
Most quality exterior wall washers are rated IP65 or better — meaning they're dust-tight and protected against direct water jets. Modern units use integrated LED modules rather than replaceable bulbs, offering 50,000+ hour lifespans with minimal maintenance. For outdoor wall lighting, that combination of durability and efficiency is hard to beat.
Wall Washer vs. Spotlight: Key Differences
Homeowners frequently confuse wall washers with outdoor spotlights — and while both illuminate exterior surfaces, they work in fundamentally different ways. Choosing the wrong fixture type is one of the most common planning mistakes in facade lighting projects.
| Feature | Wall Washer Light | Outdoor Spotlight |
|---|---|---|
| Beam Pattern | Wide, soft gradient | Narrow, focused cone |
| Best For | Flat/textured facade surfaces | Trees, sculptures, specific features |
| Mounting Distance | 6–18 inches from wall | 2–10 feet away |
| Light Effect | Even wash, reveals texture | Dramatic highlight |
| Typical Beam Angle | 60°–120° asymmetric | 15°–45° |
| Glare Control | Baffle or shield required | Aim-and-focus adjustable |
The takeaway: if your goal is to illuminate the wall itself — its surface, its texture, its architectural character — use a wall washer. If you want to highlight a single object set against or in front of the wall, a spotlight from outdoor spotlights is the better tool. Many well-designed exterior lighting schemes use both in combination: wall washers for the facade field, spotlights for focal trees or entry columns.
Planning Your Facade Lighting Layout

Good planning prevents the two most common exterior lighting failures: dark gaps between fixtures and overlapping hot spots that create uneven, patchy coverage. Before you buy a single fixture, spend time mapping your facade.
Start with your facade material. Stone and brick reward close-grazing light — mounting the fixture tight to the wall pulls out deep shadows between the individual stones, creating visual drama. Stucco and smooth concrete respond better to a softer, broader wash from slightly farther away. Wood siding calls for warm ambient light that complements the grain without creating harsh contrast.
For horizontal spacing, use the 4–8 foot rule: place fixtures every 4–8 feet along the base of the wall for even side-to-side coverage. Tighter spacing (4 ft) is better for highly textured surfaces and short walls. Wider spacing (6–8 ft) works well on smooth-finish facades and longer runs where overlap from adjacent fixtures fills the gaps naturally.
Sketch your layout on paper first. Mark the wall dimensions, window and door openings, and the locations of your nearest electrical circuits or transformer. This exercise almost always reveals conflicts — a fixture that would sit directly behind a shrub, or a run that would require crossing a paved walkway — that are far easier to solve on paper than mid-installation.
For two-story or tall facades, consider a split approach. Ground-level fixtures handle the lower 8–12 feet effectively. Above that, mid-wall mounting points — or fixtures tucked under a first-floor soffit aimed upward — extend coverage to the full facade height. Wall wash lighting designed for architectural applications often comes in multiple lengths specifically to accommodate these multi-zone layouts.
Mounting Height and Distance from Wall
The single most important variable in wall washer installation — the one that determines whether your facade looks stunning or underwhelming — is the fixture's distance from the wall. This controls everything: how much texture is revealed, how far up the wall the light reaches, and whether the effect reads as a dramatic architectural feature or a flat, forgettable glow.
The principle is straightforward: the closer the fixture to the wall, the more pronounced the grazing effect. Light skimming across the surface at a shallow angle creates long shadows behind every raised surface — every stone ridge, every mortar joint, every course of brick. Move the fixture farther from the wall, and those shadows flatten out, producing a smoother, more even wash.

| Wall Height | Recommended Fixture Distance from Wall | Mounting Position | Effect |
|---|---|---|---|
| Under 8 ft | 6–10 inches | Ground/low wall | Strong graze, deep shadows |
| 8–12 ft | 10–16 inches | Ground level | Even wash, moderate texture |
| 12–20 ft | 14–20 inches | Ground or mid-wall | Broad wash, reduced texture |
| 20 ft+ | 18–24 inches | Mid-wall or soffit | Wide even coverage |
Use these ranges as starting points, not hard rules. Every facade material and architectural profile behaves differently. If your budget allows, do a dry run with a temporary fixture before committing to permanent mounting locations — a single evening's test can save you from remounting a dozen fixtures later.
Step-by-Step Installation Guide
The following steps apply to a standard line-voltage wall washer installation on an exterior masonry or wood-frame wall. If you're working with a low-voltage landscape system, steps 4 and 6 will differ slightly — but the physical mounting sequence is the same.
Step 1: Mark Your Fixture Positions
Using your paper layout as a guide, transfer your fixture positions to the wall using chalk or painter's tape. Mark both the center of each fixture and the location of the back-plate mounting holes. Use a level to confirm fixtures along a run are at the same height. Small deviations that look trivial in daylight become glaring at night when the light reveals them.
Step 2: Run Your Wiring
Plan your conduit route before drilling a single hole. For line-voltage installations, use Schedule 40 PVC conduit for all exposed exterior runs. For underground sections, switch to UF-B direct-burial cable at least 12 inches deep (18 inches under driveways). Run wire to each fixture location before mounting any hardware — working around mounted fixtures while pulling wire is awkward at best and risks damage to the fixture housing.

Step 3: Install the Mounting Bracket
For wood-frame construction, drive lag screws into wall studs where possible. For masonry — brick, stone, or concrete block — use masonry anchors rated for the fixture's weight and wind load. Drill into the mortar joint rather than the face of the stone or brick wherever possible; mortar is easier to repair if you need to relocate. Confirm the bracket is plumb and level before setting fasteners.
Step 4: Feed and Connect Wiring
Use a weatherproof outdoor junction box at each fixture location. Feed the supply wire into the box and connect using waterproof wire nuts or lever connectors rated for wet locations. Follow the standard US color code: black to black (hot), white to white (neutral), bare copper or green to ground. Tug-test each connection before closing the box. Do not skip the ground wire — it's your safety net if the fixture housing ever becomes energized.
Step 5: Mount the Fixture
Seat the fixture on its mounting bracket and align the back plate with the wall surface. Drive mounting screws to snug — firm contact, but don't over-torque. Overtightening can crack aluminum back plates or strip masonry anchors, and either failure will cause the fixture to work loose over time as thermal expansion cycles through the seasons.
Step 6: Aim and Adjust
For adjustable wall washers, set your aiming angle before final tightening. The goal is to project light up the wall face with the beam center hitting roughly two-thirds of the way up the illuminated section. For a 10-foot wall with fixtures at ground level, that means aiming at approximately the 6–7 foot mark. Make this adjustment while you can still reach the fixture comfortably — fine-tuning aim from a ladder after the fact is a frustrating extra trip.
Step 7: Test and Seal
With all fixtures mounted and connected, restore power at the breaker and test each fixture. Confirm light output, check for any flicker (which indicates a loose connection), and do a final aim check from the street. Once you're satisfied, apply a bead of clear or color-matched silicone sealant around the perimeter of each back plate where it meets the wall. This step is skipped more often than any other — and it's the reason so many outdoor fixtures fail from water intrusion within a few years.
Wiring and Power Options
One of the first decisions in any wall washer project is voltage: low-voltage landscape system (12V) or standard line voltage (120V)? Both work. The right choice depends on your coverage area, budget, and comfort with electrical work.
Low-voltage (12V) landscape systems are the friendlier DIY option. A plug-in or hardwired transformer steps your 120V household current down to 12V. Wire runs are simpler, connections are lower-risk, and most states don't require a licensed electrician for low-voltage landscape work. The trade-off: voltage drop limits run length (typically 100 feet max from transformer to last fixture before brightness becomes noticeably uneven), and wattage per circuit is capped.
Line voltage (120V) systems deliver more punch, support longer wire runs, and give you access to a wider range of fixture options. But they require GFCI-protected circuits for all outdoor outlets and fixtures — this is a National Electrical Code (NEC) requirement, not optional. In most US states, any new 120V outdoor circuit requires a permit and must be installed or inspected by a licensed electrician. If you're adding a new circuit rather than tapping an existing outdoor outlet, budget for that cost upfront.
Regardless of voltage, consider your control strategy early. A simple mechanical timer keeps your lights on a consistent schedule. Dusk-to-dawn photosensors automate on/off without daily adjustment. For maximum flexibility — and the ability to adjust brightness, color temperature, or schedule from your phone — a smart switch or smart transformer is a worthwhile upgrade that adds relatively little cost at installation time but is significantly harder to retrofit later.
For landscape lighting projects that combine wall washers with path lights and uplights, a low-voltage multi-zone transformer with independent timer zones per output gives you the cleanest control architecture.
Choosing the Right Fixture

Not all wall washers are created equal. Here's what to look for when selecting fixtures for an exterior facade application:
- IP Rating: IP65 is the minimum for any exposed outdoor location. IP67 or IP68 is better for grade-level fixtures that may sit in standing water after rain.
- Housing material: Die-cast aluminum is the benchmark. It dissipates LED heat effectively, resists corrosion, and holds up to freeze-thaw cycles. Avoid plastic-bodied fixtures for permanent outdoor installation — UV degradation makes them brittle within a few years.
- Integrated LED vs. replaceable bulb: Integrated LED modules last 50,000+ hours with no maintenance. Replaceable bulb sockets add a potential failure point and require access for lamp changes. For fixtures mounted at ground level in planting beds, integrated is almost always the better choice.
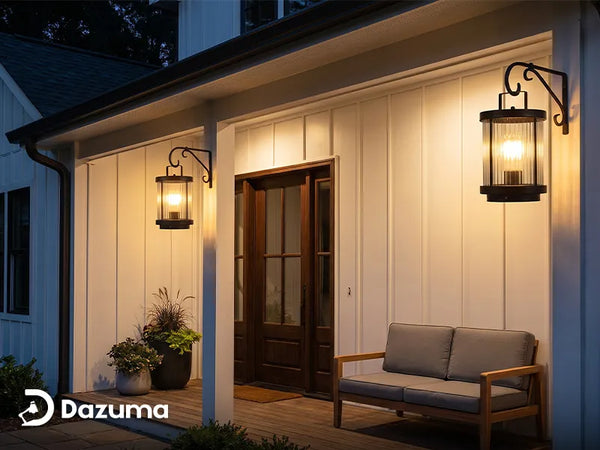
- Color temperature: 2700K–3000K (warm white) is the standard recommendation for stone, brick, and wood-sided homes — it enhances warm tones and looks natural against organic materials. 4000K (neutral white) suits modern stucco, concrete, and metal-panel facades where a crisper, cooler look is intentional.
- Linear vs. individual fixtures: Linear wall washers produce cleaner architectural lines on contemporary homes and eliminate the visual clutter of multiple individual fixture heads. Individual sconce-style wall washers offer more flexibility in placement and are easier to replace or relocate.
✦ Featured Product
Linear Up LED Outdoor Wall Washer Light
Built specifically for facade washing, this linear fixture features an integrated anti-glare baffle that keeps light where it belongs — on the wall, not in your neighbors' windows. The aluminum body is rated IP65, making it suitable for direct outdoor exposure. Multiple lengths let you match the fixture run to your wall width precisely. Mount at ground level, aim upward, and watch your facade come alive after dark.
✦ Featured Product
Up Down LED Outdoor Wall Light
When you want both a decorative statement and effective wall washing in a single fixture, this up/down wall light delivers. It projects LED light upward along the facade and downward for ground-level illumination — creating depth and layered texture with one mount point. A clean, modern profile makes it equally at home flanking a front door or lining a garage wall. Weatherproof and built for long-term outdoor performance.

Common Mistakes to Avoid
Even well-intentioned installations fall short when these avoidable errors creep in:
- Mounting too far from the wall. The most frequent mistake. Fixtures placed more than 20–24 inches from a typical residential facade lose most of the grazing angle that reveals texture. The result is a flat, undifferentiated glow rather than a sculptural effect. When in doubt, go closer.
- Skipping GFCI protection. Every outdoor electrical circuit requires GFCI protection per the NEC. This isn't bureaucratic fine print — it's a genuine shock hazard when water and electricity share an environment. A GFCI breaker or outlet costs less than $30 and takes 20 minutes to install.
- Using indoor-rated fixtures outdoors. Indoor fixtures typically have no IP rating and will fail within one season of outdoor exposure — moisture intrusion causes corrosion, wiring degradation, and eventual electrical failure. Always confirm the IP rating before purchasing. For outdoor flood lights and wall washers alike, IP65 is the baseline.
- Inconsistent fixture spacing. Uneven spacing creates alternating bright and dim bands across the facade — the opposite of the smooth wash you're after. Measure carefully and use a chalk line or laser level to confirm even horizontal alignment before drilling.
- Light trespass onto neighboring properties or into the street. Fixtures aimed too high or without baffles can project into adjacent yards, windows, or the roadway. Most municipalities have light trespass ordinances, and even where they don't, your neighbors will notice. Use fixtures with integral baffles and confirm your aim angle projects light onto your wall, not beyond it.
- Not sealing the back plate. Water finds every gap. A bead of silicone sealant around the fixture's back plate takes two minutes and prevents years of moisture intrusion that leads to corrosion, rust staining on your facade, and ultimately fixture failure.
Ready to Transform Your Facade?
Wall washer lighting is one of those upgrades that delivers an outsized return on investment — in curb appeal, security, and the simple satisfaction of coming home to a house that looks exactly as good as you always imagined it could. The technical requirements aren't intimidating once you understand the core principles: choose the right fixture, mount at the right distance, protect the wiring, and finish the details.
At Dazuma, we've curated a selection of wall wash and outdoor wall fixtures built specifically for residential exterior applications — IP-rated, aluminum-housed, and designed to perform through years of seasonal exposure. All orders over $49 ship free.
- Browse our wall wash lighting collection for linear and adjustable wall washers
- Explore outdoor wall lighting for sconces, up/down fixtures, and entry wall lights
- Find outdoor spotlights to complement your wall washer scheme with targeted accent lighting
If you have questions about which fixture fits your project, our team is happy to help. Use the chat on any product page, or reach out directly — we know this stuff and we're here for it.

![[Open-Box]Up Down Lighting LED Outdoor Waterproof Modern Wall Washer Light](http://dazuma.us/cdn/shop/products/compact-narrow-beam-led-wall-sconce-up-down.jpg?v=1767081221&width=400)