Who This Is For: Homeowners, landscape enthusiasts, and outdoor décor lovers who want to transform their yard after dark. Whether you have a single showpiece oak or a layered garden full of shrubs and ornamental trees, this guide walks you through everything you need to know to uplight your landscape beautifully — without complicated wiring or a big budget.
There's a moment every homeowner experiences — you pull into your driveway after dark, look at your house, and think: something is missing. The garden you spent all spring cultivating? Invisible. The beautiful oak you planted a decade ago? Just a shadow. The carefully trimmed hedges lining your front walk? Gone. Nighttime swallows all of that effort, and the exterior of your home looks flat, uninviting, and incomplete.
Uplighting changes all of that. With the right fixtures positioned at ground level and angled upward, you can bring your trees, shrubs, and architectural plants back to life after sunset. The result is a landscape that looks intentional, dramatic, and luxurious — the kind of curb appeal that makes neighbors slow down as they drive past. And the best part? It's far more accessible than most people think, especially with today's solar-powered options.
In this guide, we're going to cover everything: the technique itself, how to choose the best plants to feature, where to place your lights, and how to avoid the most common mistakes that turn a beautiful concept into a glaring eyesore. By the time you're done reading, you'll have a clear, actionable plan to make your landscape shine — literally.
What Is Uplighting?

Uplighting is a landscape lighting technique in which one or more fixtures are placed at ground level — or just below it — and aimed upward toward a tree, shrub, wall, or architectural feature. The light travels upward, revealing texture, depth, and form that daylight often flattens out. Shadows cast upward through branches create a canopy effect that's nearly impossible to replicate with any other lighting approach.
The fixtures used for uplighting are typically called spotlights or floodlights. Spotlights create a tight, focused beam ideal for single-trunk trees and accent features, while floodlights cast a wider angle suited to large canopies or multi-stem shrubs. Modern outdoor spotlights come in both solar-powered and low-voltage wired versions, making them flexible for nearly any yard configuration.
What separates professional-looking uplighting from amateur attempts is intentionality. The goal isn't simply to shine a light at a tree — it's to sculpt light and shadow in a way that emphasizes the most beautiful qualities of that plant. A well-placed uplight reveals bark texture, highlights the graceful spread of branches, and creates layers of illumination that make a two-dimensional lawn look three-dimensional and alive.
Why Uplight Trees? The Benefits You Haven't Considered
Most people first think about uplighting purely for aesthetics, and yes — the visual payoff is stunning. But the practical benefits go well beyond "it looks nice."
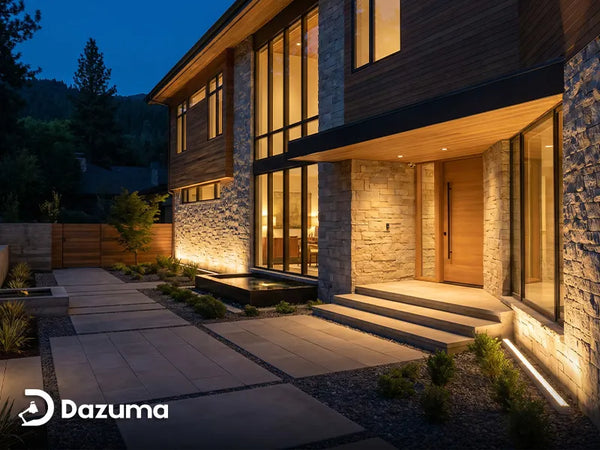
Curb Appeal and First Impressions
Lit landscaping instantly elevates the perceived value and care of a property. Real estate professionals consistently report that exterior lighting — especially landscape uplighting — ranks among the highest-ROI improvements a homeowner can make. When potential buyers or guests arrive at night, a well-lit yard communicates pride of ownership before they ever reach the front door.
Security Without the Harsh Glare
Security lighting doesn't have to mean blinding floodlights mounted on eaves. Landscape lighting placed strategically around trees and shrubs eliminates dark hiding spots without creating the harsh, institutional feel of utility lighting. Motion-sensitive solar uplights in particular offer a best-of-both-worlds solution: ambient beauty when nothing is moving, bright deterrence when something is.
Extended Outdoor Living
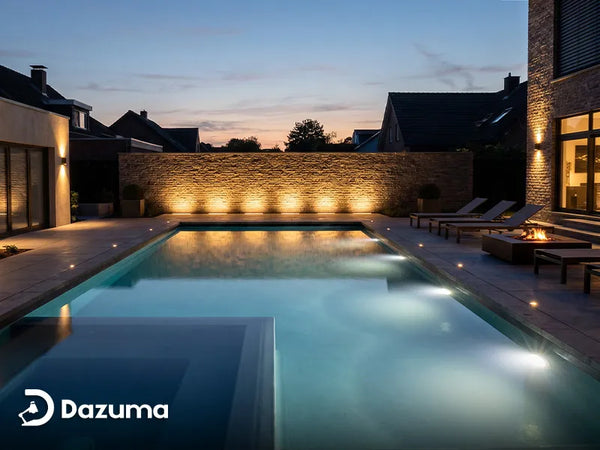
Uplighting extends the functional hours of your outdoor spaces. A patio feels intimate and inviting when surrounded by glowing trees. A garden path flanked by illuminated shrubs becomes a destination rather than just a route. People naturally linger in spaces that feel well-designed and safe, and light is the fastest way to transform the feeling of any outdoor area.
Property Value
Studies from the American Society of Landscape Architects suggest that well-executed landscape lighting can increase property values by 5 to 15 percent. That's a significant return for an investment that, thanks to solar technology, can now be made for well under $100 per fixture.
Choosing the Right Trees and Plants to Uplight
Not every plant in your yard deserves a spotlight, and that's actually a feature, not a limitation. Uplighting works best when it creates hierarchy — a few featured elements that stand out against a darker, receding background. The art is in choosing which plants will reward the light.
Best candidates for uplighting include:
- Oak, maple, and beech trees — The deeply textured bark and spreading canopy structures of these hardwoods create spectacular shadow play when lit from below.
- Ornamental Japanese maples — Their delicate, layered branching structure becomes extraordinarily sculptural under a narrow spotlight beam.
- Palms — The vertical trunk and feathery crown make palms among the most dramatic uplight subjects of any plant.
- Crape myrtles — Their multi-stem habit and peeling, colorful bark catch light beautifully from multiple angles.
- Ornamental grasses — When backlit or side-lit from a low angle, ornamental grasses glow like torches and add movement as the wind passes through.
- Arborvitae and columnar evergreens — Their tight, vertical form makes them excellent anchors for symmetrical lighting arrangements flanking entries and driveways.
- Flowering shrubs (hydrangea, azalea, rhododendron) — When in bloom, these shrubs take on an almost otherworldly quality under warm uplighting.

Plants to skip: flat groundcovers, low-growing annuals, and dense boxwood hedges rarely reward uplighting because they lack the height and vertical structure that make the effect work. Save the light budget for specimens that have compelling form, interesting bark, or architectural branching.
Placement, Angles, and Distance from the Tree
The placement of your uplights determines everything. Get it right and you get drama; get it wrong and you get glare, harsh shadows, or a washed-out look that reveals no texture at all.
Distance from the trunk: For most medium to large trees, position your uplight fixture 1 to 3 feet from the base of the trunk. This tight placement maximizes the upward throw of light through the canopy. For wide-spreading trees with low branching, you may need to move the fixture out 3 to 6 feet to capture the full spread. For small ornamental trees or shrubs, 6 to 18 inches from the base is usually ideal.
Beam angle: Most adjustable spotlights offer beam angles between 15° (tight spot) and 60° (flood). As a general rule, use a narrower beam for single-trunk, upright trees and a wider beam for multi-stem shrubs or broad canopies. A 30° to 45° beam angle is a versatile starting point for most residential applications.
Vertical angle: Aim your fixture so the beam strikes the canopy at roughly a 45° to 60° angle from the horizontal. Steeper angles (closer to vertical) work better for columnar trees and tight spaces, while shallower angles emphasize bark texture on the lower trunk and work well on specimen trees with interesting base structure.
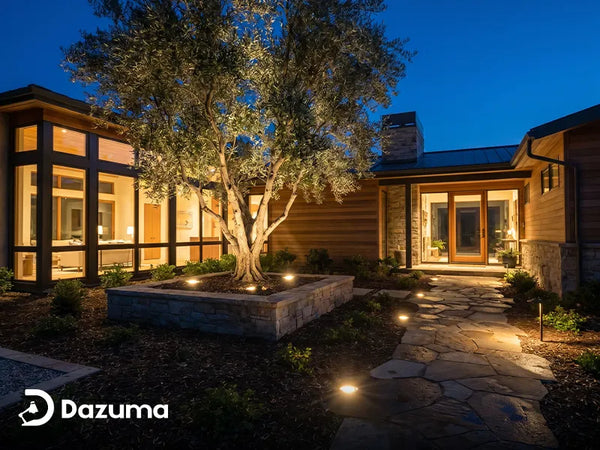
Using multiple fixtures: For large trees with spreading canopies, two or three fixtures placed at different angles around the tree will eliminate flat spots and create a fully three-dimensional effect. Aim each fixture at a different section of the canopy rather than all pointing at the same spot. The overlapping pools of light create a natural, organic glow rather than a single harsh beam.

Solar vs. Wired Uplights: Which Should You Choose?
This is the question most homeowners wrestle with, and the honest answer depends on your priorities. Both technologies have matured significantly in recent years, and both have legitimate use cases.
Solar Uplights — The Case For
Solar-powered solar outdoor lights have transformed landscape lighting for the average homeowner. The installation is as simple as pushing a stake into the ground — no trenching, no electrician, no conduit. Modern solar uplights use high-efficiency monocrystalline panels that can charge adequately even on partly cloudy days, and quality lithium-ion batteries now hold enough charge for 8 to 12 hours of operation on a single day's sun. The auto dusk-to-dawn feature means you set them once and forget about them — they come on at sunset and turn off at sunrise automatically.
Solar lights are also highly flexible. Want to experiment with placement before committing? Simply move the stake. Renovating the garden? No wiring to reroute. This ease of repositioning is a significant advantage during the design phase, when you're figuring out which placement angles work best for each tree.
Wired Low-Voltage Uplights — The Case For
Low-voltage wired systems (typically 12V DC run through a transformer) offer two key advantages: consistent brightness and the ability to control multiple fixtures from a single smart timer or controller. If you're installing lights in a heavily shaded yard where solar panels may not get enough daily sun, wired systems are the more reliable choice. They're also preferred for high-end landscape designs where precise control over brightness and timing is important.
The tradeoff is installation complexity. Wired systems require trenching cable, installing a transformer, and ideally hiring a licensed electrician for any work that connects to your home's main panel. The upfront cost is significantly higher than solar.
The verdict: For most homeowners doing a first landscape lighting installation or working with 2 to 8 fixtures on trees and shrubs, solar uplights are the smarter starting point. They're lower cost, zero wiring, and today's quality is genuinely impressive. Wired systems make more sense for large installations, heavily shaded properties, or professionally designed landscapes where precise control is required.
✦ Featured Product

Adjustable Solar Spot Light (HA078172)
This solar-powered adjustable spotlight is purpose-built for ground-stake uplighting of trees and shrubs. The flexible pivot head lets you dial in the exact beam angle for any tree — no tools, no hassle. Fully wireless and auto dusk-to-dawn, it delivers bright, reliable illumination without running a single foot of wire. Ideal for homeowners who want to start uplighting today without any installation complexity.
Color Temperature Guide: 2700K to 4000K Explained
Color temperature is measured in Kelvin (K) and describes the warmth or coolness of a light source. For landscape uplighting, choosing the right color temperature has as much visual impact as placement angle — maybe more.

2700K — Warm White (Incandescent-Like)
The warmest option, 2700K produces a golden, amber-tinged glow that feels organic and romantic. It's the classic choice for deciduous trees with interesting bark (oak, birch, cherry) and for flowering shrubs. This color temperature makes foliage look rich and warm, and it pairs beautifully with traditional architecture — brick, stone, wood siding. If you want your landscape to look like a magazine spread from an upscale home & garden publication, 2700K is almost always the right answer.
3000K — Soft White
Slightly cooler than 2700K but still firmly in the warm range, 3000K is often considered the sweet spot for outdoor residential lighting. It renders greens and earth tones accurately while still maintaining a warm, inviting character. This is an excellent choice for mixed plantings where you want the foliage color to read naturally without the slight orange cast of 2700K.
3500K — Neutral White
At 3500K, you're in the middle of the spectrum — neither warm nor cool. This temperature works well for contemporary architecture and minimalist landscapes where you want a crisp, clean look. It's also a good choice for highlighting architectural plants like agave, yucca, or structured topiary where you want to emphasize geometric form over organic warmth.
4000K — Cool White
Cool white uplighting creates a more dramatic, theatrical effect. It renders foliage with a blue-green cast that can look spectacular on certain plants — particularly silver-leafed species, ornamental grasses, and blue spruces. However, 4000K can look harsh and unnatural on brown bark and warm-toned foliage. Use it deliberately and sparingly for maximum impact, or mix it with 2700K fixtures to create contrast in a larger landscape design.
Quick Reference:
- Warm-toned bark, flowering shrubs, traditional architecture → 2700K
- Mixed plantings, general landscaping → 3000K
- Contemporary design, structured plants → 3500K
- Dramatic effects, silver or blue-toned foliage → 4000K
Step-by-Step: How to Set Up Solar Uplights
Setting up solar uplights is genuinely one of the most approachable DIY projects a homeowner can tackle. Here's a complete walkthrough from unboxing to first night of operation.
Step 1: Choose Your Siting Locations
Before you open a single box, walk your yard at night and identify which trees and shrubs you want to feature. Note the direction of ambient light (streetlights, porch lights) so you can compensate with your placement. Identify any obstructions — roots, hardscape, existing path lights — that might interfere with ground-stake placement.
Step 2: Find the Best Solar Panel Exposure
Solar uplights need their panels to receive direct or near-direct sunlight for several hours each day. Before committing to a location, spend a few minutes observing shade patterns during peak sun hours (10 AM to 2 PM). The fixture base (with the ground stake and panel) must sit in a sunny area, but many solar uplights have a flexible cable between the panel and the fixture head, giving you a foot or two of positioning freedom.
Step 3: Pre-Charge Before First Use
For best first-night performance, set your new solar uplights in direct sun for a full day before their first operational night. This gives the battery a complete initial charge and ensures they'll run through the night without dimming prematurely.
Step 4: Position and Stake
Push the ground stake firmly into the soil at your chosen position. Most stake-mounted fixtures can be angled after installation — tilt the fixture head to aim the beam at the focal point of your tree. If the soil is very hard, pre-poke a starter hole with a screwdriver or stake tool to avoid bending the fixture mount.
Step 5: Adjust the Beam Angle
Turn the fixture on (or activate it by covering the solar panel briefly to simulate darkness) and fine-tune the vertical and horizontal aim. Step back 15 to 20 feet to evaluate the effect from a viewing distance. Look for: the beam catching the interesting parts of the canopy, no direct glare visible from the street or primary viewing angles, and a natural-looking spread of light rather than a single harsh hot spot.
Step 6: Test and Iterate
The best landscape lighting designs are never set-and-forget on day one. Spend a few evenings observing the effect from different vantage points — the street, the front door, the porch. Adjust placements as needed. Try moving a fixture 6 inches to the left, or tilting it 10 degrees more steeply, and compare the result. This iterative process is how professional designers fine-tune installations, and with solar fixtures it costs nothing.
✦ Featured Product

Outdoor Waterproof Solar Spot Light
Built for year-round outdoor use, this waterproof solar landscape spotlight is ideal for courtyards, gardens, and lawns where weather reliability matters. The adjustable multi-head design lets you illuminate multiple shrubs or flower beds from a single fixture, and the bright output delivers real illumination rather than the dim glow you might expect from solar. It's a versatile workhorse for anyone building out a complete landscape lighting scheme.
Common Uplighting Mistakes to Avoid

Even with the best fixtures, a few easily avoidable mistakes can undermine your landscape lighting results. Here are the ones we see most often — and how to fix them.
Mistake 1: Over-Lighting
More light is not always better. Saturating every plant in your yard with spotlights eliminates the contrast that makes uplighting dramatic. The eye needs dark areas to appreciate the lit ones. A good rule of thumb: light no more than 30 to 40 percent of your visible plants, and let the rest recede into the background. Feature your best specimens; let the supporting cast stay in shadow.
Mistake 2: Aiming Directly at the Trunk with a Flood Beam
A wide-angle beam aimed straight at the base of a trunk creates a bright patch on the bark with little light reaching the canopy — the opposite of what you want. Use a narrower spot beam aimed upward into the canopy, or position the fixture farther back and angle it more steeply to ensure the light travels up through the branches.
Mistake 3: Visible Glare from Primary Viewing Angles
If you can see the bare bulb of your uplight fixture from your front door, the driveway, or the street, it will create uncomfortable glare that undermines the whole effect. Tuck fixtures behind plant bases, rocks, or decorative mulch rings to hide the source while letting the light do its work. The best uplighting makes the source invisible — you only see the illuminated tree, not the light producing it.
Mistake 4: Ignoring the Panel's Sun Exposure
Solar uplights that don't get adequate sun will underperform on the first night and fail by midnight. Always verify panel exposure during the design phase, not after installation. If a tree casts dense shade all day, that location will not support reliable solar fixture operation — consider a fixture with a remote panel on a longer cable, or switch to a wired solution for that specific spot.
Mistake 5: Using Only One Color Temperature Throughout
A yard lit entirely in 4000K cool white can feel clinical and cold. A yard lit entirely in 2700K warm white can lack crisp definition. Professional designers often mix color temperatures — warm light on organic elements (trees, shrubs, flowers) and slightly cooler light on hardscape and architectural features. Even a subtle shift from 2700K to 3000K between two zones creates a pleasing visual rhythm.
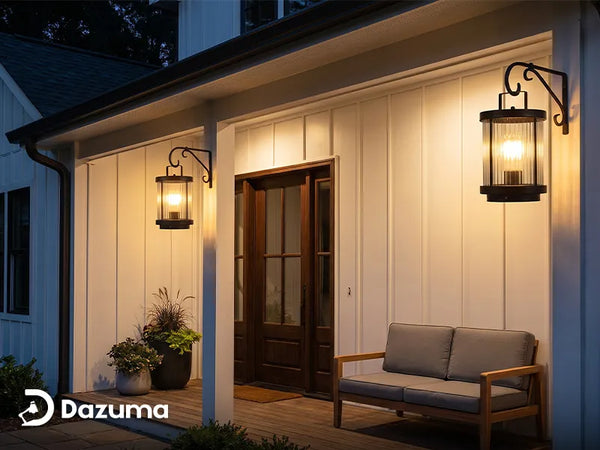
Mistake 6: Forgetting About Outdoor Wall Lighting Integration
Landscape uplighting looks its absolute best when it's part of a cohesive outdoor lighting plan that includes wall sconces, path lights, and porch fixtures. A beautifully lit tree in a yard with mismatched or absent wall lighting creates an odd disconnect. Think of your outdoor lighting as a single system, and design it holistically from the start.
Ready to Light Up Your Landscape?
Uplighting is one of those rare home improvements where the visual payoff is immediate, the installation is approachable, and the long-term operating cost — especially with solar — is essentially zero. From a single statement tree in your front yard to a fully layered landscape design with a dozen featured plants, the principle stays the same: position your lights thoughtfully, choose the right color temperature, keep glare hidden, and let your trees do the talking.
At Dazuma, we curate outdoor and landscape lighting that balances performance, aesthetics, and value. All orders over $49 ship free, so it's easy to start with a pair of solar uplights for your two best trees and expand from there. Whether you're lighting a backyard garden, a courtyard, or a full front-yard landscape, we have fixtures that will work hard and look beautiful.
Browse our collections below to find the perfect fixtures for your next outdoor lighting project. If you have questions about what will work best for your specific yard, we're here to help — reach out anytime.
- Shop Outdoor Spotlights — Tight beams for featured trees and architectural plants
- Shop Solar Outdoor Lights — Wire-free, auto dusk-to-dawn landscape lighting
- Shop All Landscape Lighting — Complete uplights, path lights, and garden fixtures