



Outdoor Lights for Pillar Tops Modern Copper Waterproof Light

DESCRIPTION
Description:
This outdoor lights for pillar tops features a clean square lantern-inspired structure with a copper body and glass panels, creating a refined look for villa entrances, garden walls, and exterior pillars. The glass shade allows light to spread evenly around the fixture, providing comfortable illumination for gates and courtyard areas after dark. The product is available in two versions: a hardwired model and a solar + hardwired dual-power model. The hardwired version comes with neutral light, while the dual-power version supports both solar and hardwired power and offers three light colors. An E27 bulb socket allows convenient bulb replacement. Made from copper and glass with an IP65 waterproof rating, the fixture is available in antique copper, black-gold, and natural copper finishes.
Highlights:
Four Size Options: This outdoor lights for pillar tops available in four sizes to suit various column proportions.
Two Version Options: Choose between a hardwired model and a solar + hardwired dual-power model.
Dual-Power Design: The dual-power version supports both solar and hardwired operation.
Copper Construction: Copper framing and glass panels create a refined exterior appearance.
IP65 Weather Protection: Suitable for gates, courtyards, walls, and exterior pillars.
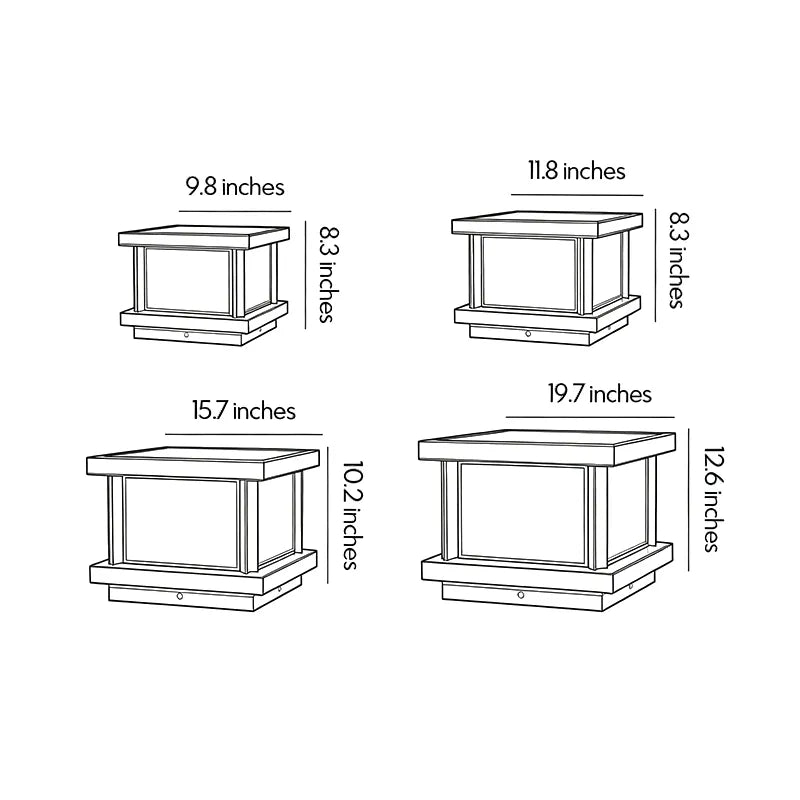
WEIGHTS & DIMENSIONS
DETAILS
| Product Type: | Pillar Lights |
| Power Supply: | Hardwired,Solar |
| Power: | Hardwired: 12W / Solar: 12W+3W / 3W / 6W / 9W |
| Voltage: | 110V |
| Style: | Modern |
| Bulb Base: | E27 |
| Color Temperature: | 3-Color Temperature (3000K/4500K/6000K),Neutral (4500K) |
| Finish: | Black,Copper |
| Material: | Copper |
| Shade Color: | Clear |
| Shade Material: | Glass |
| Control Type: | Remote Control Switch,Solar Light Control,Wall Switch |
| Mounting Type: | Placed |
| Ingress Protection: | IP65 |
| Indoor/Outdoor: | Outdoor |
| Product Care: | Turn Off the Power,Wipe Clean with Dry Cloth |
NOTE
1 in = 2.54 cm; 1 cm = 0.39 in
* Should you require any further information about our products and services, feel free to Contact Us.
Shipping & Delivery
Shipping & Delivery
Free Shipping
Dazuma offers free standard shipping on orders over $49. For orders under $49, a flat shipping fee of $9.99 will apply.
Processing Time
We start processing your order as soon as it is placed. You will receive an email confirmation upon placing your order. Please review your order details carefully for accuracy. Processing times are as follows:
- Standard Products: 7–10 business days.
- Custom or Bulk Orders: 10–35 business days.
- Peak Periods or Holidays: Processing times may extend during high-order volumes.
Shipping Methods & Delivery Times
Dazuma provides the following shipping options to suit your needs:
Standard Shipping
- Estimated Delivery Time: 15–25 business days.
- Cost: Free for orders over $49; $9.99 flat rate for orders under $49.
Expedited Shipping
- Estimated Delivery Time: 7–10 business days.
- Cost: Additional fees apply; calculated at checkout.
Note: Delivery times may vary depending on your location and carrier logistics.
Shipping Costs
Shipping costs are calculated based on:
- The shipping method you select.
- The weight and dimensions of your order.
- The delivery destination.
The total shipping cost will be displayed at checkout before completing your purchase.
Order Tracking
Once your order ships, you will receive an email that includes:
- A tracking number.
- A link to track your package.
- The carrier’s information (e.g., UPS, FedEx, DHL).
You can also track your order via our website on the Order Tracking page.
Shipping Delays
We strive to deliver your order on time; however, delays may occur due to:
- Inventory availability or processing capacity.
- High order volumes during peak seasons.
- Unforeseen circumstances such as natural disasters or strikes.
- Customs clearance issues or carrier delays.
If a significant delay occurs, we will notify you promptly. For urgent assistance, please contact Dazuma Customer Service.
Lost or Damaged Packages
Lost Packages
- If your package is not delivered within 15 business days of the expected delivery date, please contact us.
- We will work with the carrier to locate your package or provide a replacement/refund.
Damaged Packages
- If your package arrives damaged, please contact us within 48 hours of delivery.
- Provide photos or videos of the damaged item and packaging to expedite the resolution process.
Ownership & Authorized Online Operations
Dazuma is a lighting brand owned by DUSTERONE SARL, 44 Rue Beaurepaire, 49100 Angers, France.
Dazuma.us is an authorized online retail channel for Dazuma-branded products. HONGKONG GAOXUNBOO TECHNOLOGY CO., LIMITED is authorized by DUSTERONE SARL to support global e-commerce operations, including online store management, order processing, customer-service coordination, payment support, and logistics coordination for Dazuma.us.
Authorized U.S. Return & Exchange Receiving Facility
For approved returns and exchanges only:
Recipient: MH022 Address: 21 Central Ct STE #7, Leominster, MA 01453, United States
Please contact Dazuma Customer Support before sending any return or exchange shipment. Packages sent without prior authorization, missing order information, or sent to the wrong facility may be delayed, refused, or returned to sender.
Additional Information
- International Shipping: Available to select locations.
- Non-Serviceable Addresses: We cannot deliver to Alaska, Hawaii, P.O. Boxes, APO/FPO addresses, or restricted areas.
- Customs and Duties: All customs fees, import taxes, and duties are included in the shipping cost.
- Installation & Assembly: Dazuma does not provide on-site installation, assembly, indoor placement, or labor services.
- Non-Refundable Shipping Charges: Please note that shipping charges are non-refundable.
Return & Refunds
Return & Refunds
At Dazuma, we are committed to enhancing your home with thoughtfully designed lighting and home décor. While every order is rigorously inspected by our QA team before shipping, we understand that a return or refund may occasionally be necessary. This policy outlines the process for returns, refunds, and exchanges to ensure a seamless experience.
1. Order Cancellation Policy
Cancellation Before Shipping: You may cancel your order for a full refund at any time before the product has been shipped. Please contact us immediately at [email protected] to process your request.
Cancellation After Shipping: Once an order has been transferred to the carrier and is in transit, it cannot be canceled or modified. If you no longer wish to keep the item, please refer to our return policy after receiving the package.
Customized Orders: Once production of a custom or specialty order (non-stock sizes/designs) has begun, the order cannot be canceled or modified.
2. Return Window & Eligibility
Geographical Restriction: We only offer return and exchange services for orders delivered within the United States. We do not accept returns or exchanges from countries or regions outside the USA.
30-Day Strict Deadline: We offer a 30-day return window from the date of delivery. You must initiate your return request within this period. No returns or refund requests will be accepted after 30 days of receipt.
Condition Requirement: To be eligible for a return, items must be in their original condition: unused, unassembled, undamaged, and in their original packaging (unopened). All original tags, instructions, and inserts must be included.
3. Non-Returnable Products
The following items are strictly non-returnable and non-refundable:
Orders from outside the USA.
Customized or personalized items (unless there is a confirmed quality defect).
Items that have been assembled, used, or altered.
Clearance items, "Open Box" items, or final sale items.
Gift cards.
4. Return Shipping Costs
Quality Issues (Defective/Damaged/Mis-shipped): Dazuma will be responsible for the return shipping costs for orders that are defective, damaged, or mis-shipped. Please report such issues within 48 hours of delivery.If it is a quality issue, please contact [email protected] and provide photos/videos.
Non-Quality Issues (Change of Mind): For returns due to personal preference (e.g., style, size, or color), the customer is responsible for all round-trip shipping costs, including the original shipping cost paid by Dazuma and the return shipping fee.
5. How to Initiate a Return (USA Orders Only)
Contact Us: Email [email protected] with your order number and reason for return.
Approval: Once approved, you will receive the correct return address. Do not send items back without prior authorization.
Packaging: Securely package the item and include a note with your order number and product ID inside the box.
Tracking: Use a trackable shipping method. Dazuma is not responsible for lost or undelivered return packages.
6. Refund Process
Inspection: Once we receive and inspect your return, we will notify you of the approval or rejection.
Approved Refunds: Refunds will be issued to your original payment method within 5–10 business days.
7. Damaged or Defective Products
Visible Damage: If damage is visible upon delivery, please reject the shipment and contact us immediately.
Concealed Damage: If you discover damage after opening, you must contact us within 48 hours of delivery. Provide photos of the damaged item and all original packaging.
Dazuma will work with you to provide a replacement or refund, based on your preference.
8. 2-Year Quality Support & Warranty
We are committed to the longevity of your Dazuma lighting. To ensure your space remains perfectly lit, we provide a 2-year support framework for all fixtures:
Within 1 Year of Delivery: Should any functional issues or manufacturing defects arise (such as driver or LED failure), Dazuma will provide the necessary replacement components or a new unit at no additional cost to you.
Year 2 Support: For items entering their second year of use, our commitment continues through our Extended Loyalty Program. If a component requires replacement after the first 12 months, we offer exclusive, high-value discounts on replacement parts or new units to ensure your Dazuma collection remains in top condition.
How it works: If you have questions about your product's performance, simply reach out to [email protected]. Our technical team will review the details (please include your order number and any relevant photos) and provide the most efficient resolution for your specific case.
We strive to make returns, refunds, and exchanges simple and stress-free. For assistance, please contact Dazuma Customer Service.
9.The terms need to be explained:
If the return is caused by the consumer, consumer should be responsible for the shipping fee. The specific fee should be based on the express company you choose.
If due to our reasons, the goods received are damaged or not correct, and the consumer is not required to bear the shipping fee for this reason.
Authorized U.S. Return & Exchange Receiving Facility
For approved returns and exchanges only:
Recipient: MH022 Address: 21 Central Ct STE #7, Leominster, MA 01453, United States
Please contact Dazuma Customer Support before sending any return or exchange shipment. Packages sent without prior authorization, missing order information, or sent to the wrong facility may be delayed, refused, or returned to sender.
Ownership & Authorized Online Operations
Dazuma is a lighting brand owned by DUSTERONE SARL, 44 Rue Beaurepaire, 49100 Angers, France.
Dazuma.us is an authorized online retail channel for Dazuma-branded products. HONGKONG GAOXUNBOO TECHNOLOGY CO., LIMITED is authorized by DUSTERONE SARL to support global e-commerce operations, including online store management, order processing, customer-service coordination, payment support, and logistics coordination for Dazuma.us.
FAQ
FAQ
FAQs you need! Get instant answers to everything you want to know right here. Your questions answered in one convenient place.
Ordering & Payments
What Types of Credit Card Payments Do You Accept?
Dazuma accepts Visa, MasterCard, American Express, Discover, Diners Club, JCB, and UnionPay credit cards. Here is a list of Valid Payment Methods
What Should I Do If My Payment Method Is Declined at Checkout?
If your payment is declined, it may be due to factors such as incorrect billing details, insufficient funds, or fraud protection measures by your card issuer. Start by reviewing your card information for accuracy. If the issue persists, please contact Dazuma Customer Service for assistance.
How Will I Know My Order Has Been Received?
After placing your order, a confirmation page will display your transaction details. You can print this for your records. Additionally, a confirmation email will be sent to the email address provided. When your order ships, you’ll receive further emails with tracking information.
How Can I View an Order I’ve Placed?
Log into your Dazuma account and navigate to your Orders. If you’re unable to locate your order, please contact Dazuma Customer Service for help linking the order to your account.
Can I Change or Cancel My Order?
Once Dazuma receive your order, we begin processing it right away, so changes or cancellations may not always be possible. Additionally, orders cannot be modified online after they’ve been placed.
However, we understand that situations may arise where you’d like to request a change or cancellation. If this happens, please contact Dazuma Customer Service as soon as possible. We will do our best to accommodate your request.
If your order has already shipped before the cancellation or change is confirmed, you can return the item in accordance with our Return Policy. Please note that certain items, especially non-returnable ones, cannot be canceled.
Are Installation or Labor Costs Included in the Prices?
No, Dazuma is not responsible for installation or labor costs related to handling, storing, installing, or uninstalling items purchased from us.
Shipping & Delivery
Is Free Shipping Available?
Yes, Dazuma offers free standard shipping on orders over $49. Expedited delivery options are available at an additional cost.
How Much Does Shipping Cost?
Shipping costs are determined by the delivery location, the item's size and weight, and the selected shipping method. Exact fees will be calculated and shown during checkout. Additional surcharges may apply for deliveries to remote areas.
Are Customs Taxes Covered?
Dazuma covers all customs taxes for your orders. Whether you’re shopping locally or internationally, you can enjoy a seamless experience without worrying about unexpected customs fees.
How Long Will It Take for My Order to Arrive?
Delivery time includes both processing and shipping times:
1. Processing Time:
• Standard products: 7–10 business days.
• Custom or bulk orders: 10–35 business days.
• Processing may take longer during holidays or peak periods.
2. Shipping Time:
• Varies by location and shipping method.
• Expedited shipping: 7–10 business days (estimated).
• Standard shipping: 15–25 business days (estimated).
Delays may occur due to inventory availability, processing capacity, or unexpected events like strikes or natural disasters. If there are any delays, we will notify you promptly. For more details, visit Dazuma Shipping Info.
Why Didn’t I Receive an Email About My Order Delivery?
Once your order is dispatched, you’ll receive a tracking number via email within 1–2 business days. Please ensure your email address is accurate and check your spam folder if you don’t see the email.
How Can I Track My Package?
Visit the “Order Tracking” section on our website once your tracking number is updated by the courier. Note: Tracking updates may take time due to international shipping and customs clearance processes. Contact Dazuma Customer Service for help if you encounter any issues.
Can I Modify My Shipping Address?
You can contact Dazuma Customer Service to update your shipping address before the package ships. After shipment, address changes will not be possible.
Returns & Refunds
What Should I Do If I Receive a Damaged Item?
If your item arrives damaged, please follow these steps:
- Document the Damage: Take clear photos or videos of the damaged item, its packaging, and the shipping label.
- Contact Us: Email us at [email protected] with your order number and the photos attached.
- Resolution: After reviewing your case, we will arrange a refund or replacement at no additional cost.
How Do I Return a Product?
You can return eligible items within 30 days of delivery. Follow these steps to initiate a return:
1. Contact Customer Service: Reach out to Dazuma Customer Service to confirm the return address.
2. Package the Item: Retain all packaging materials and shipping notes. Securely pack the item and include a note with the following details:
- Order number
- Product ID or name and quantity
- A brief description of the issue with the product
3. Arrange Pickup: Make the package available for pickup as instructed.
4. Provide Tracking Information: Share the tracking number and a copy of the shipping receipt with Dazuma.
For more details, review our Return Policy.
How Is My Refund Calculated for Returns?
If you decide to return a returnable item because you’ve changed your mind, we will issue a partial refund. This refund will cover the cost of the item minus the original shipping fees. Additionally, you will be responsible for the return shipping costs.If the return is due to an item being damaged, defective, or incorrect, we will provide a full refund or a replacement at no charge. For further details, please refer to our
When Will I Receive My Refund?
Refunds are typically processed within one week after we receive and inspect the item. However, due to shipping, inspection, and banking processes, it may take up to 30 days for the refund to appear on your card.
Warranty & Support
Do Your Products Come With a Warranty?
Yes, Dazuma proudly stands behind the quality of our products. We offer a One-Year Warranty that covers defects in materials or workmanship. If you discover such a defect within one year of purchase, we will repair or, at our discretion, replace the product at no additional charge.Please note:
• The warranty does not cover defects, breakage, or malfunctions caused by mishandling or improper use of the product.
• Light bulbs included with the product are not covered under this warranty.
Who Should I Contact If I Have a Complaint?
Your satisfaction is our priority. Please contact Dazuma Customer Service via phone, live chat, or email, and we’ll do our best to resolve your concerns promptly.
Account Management
How Can I Update My Email Address?
Currently, email addresses cannot be updated. If you have no pending orders, contact Dazuma Customer Service to delete your account and create a new one with the updated email.
How Can I Update My Shipping Address?
Visit the “Profile-Address” section in My Account to add, update, or delete shipping addresses.
How Do I Unsubscribe From Emails?
Click the unsubscribe link at the bottom of any email and follow the instructions.
Promotions & Discounts
How Do Your Coupon Promotions Work?
To use a Dazuma coupon code, simply enter it during checkout. Once applied, your cart will reflect the discount associated with the code.Please keep in mind:
• They cannot be applied to special orders or previous purchases.
• Coupons cannot be combined with other discounts or markdown pricing.
• Each coupon is limited to one use per customer and is non-transferable.
• Coupons cannot be redeemed for cash or gift certificates.
Do You Offer Gift Cards?
Yes, Dazuma Gift Cards are available on our website and can be redeemed at checkout.
Custom Orders & Bulk Purchases
Can I Customize a Product?
While most items are sold as-is, we’re happy to explore customization options for bulk or special orders. Contact Dazuma Customer Service to discuss your requirements.
Do You Offer Discounts for Bulk Orders?
Yes, Dazuma offers special discounts for bulk purchases through our Trade Professionals Program, designed for qualified trade professionals such as designers, architects, and contractors.Key benefits include:
• Exclusive discounts on large orders.
• Personalized support from a dedicated trade account manager.
• Free and straightforward enrollment via our website.
If you need a quotation for a substantial purchase, our trade account managers are ready to assist. Contact Dazuma Customer Service and start saving on your next project!
Share this product


THE DAZUMA STANDARD

AUTHENTIC MATERIALS
Genuine natural silk, solid brass, and artisan glass.

QUALITY ASSURANCE
Rigorous 7-stage inspection for every fixture.

EXPERT SUPPORT
Provide online chat and email support services 24/7.

BESPOKE SOLUTIONS
Tailored dimensions and finishes for your specific needs.

7,000+ DESIGNS
Curated collections featuring the latest architectural trends.
Browse our selection of premium lighting, thoughtfully organized by the rooms they illuminate.


Discover our diverse aesthetics. Find the design language that speaks to your unique home décor.


Every material tells a story. From the cool touch of Stone to the warmth of Rattan, find the perfect finish to define your interior narrative.


Explore lighting optimized for specific zones—including indoor sanctuaries and outdoor landscapes.


Professional lighting support for residential and commercial projects, with project pricing, customization, and technical guidance from concept to installation.


Outdoor Lights for Pillar Tops with a Low, Wide Profile
Outdoor lights for pillar tops can make an entrance visible without placing a tall lantern above the wall. This fixture has a flat, slightly projecting square roof, four dark upright corner supports, and broad illuminated faces held between them. A second horizontal dark band sits below the glowing body. In the image, the light rests on a layered stone pillar cap, where its compact height leaves the masonry clearly visible.
Why the Roof Overhang Matters to the Design
The square roof extends beyond the illuminated center and gives the fixture a clear top edge when seen from the road. It also casts a dark line above the glow, balancing the band beneath it. The resulting profile is wider than it is tall. On a substantial masonry pier, that width can feel anchored and purposeful; on a narrow cap, the same roof may look crowded or overhang the usable mounting area.
Dark corner uprights keep the illuminated panels visually separate. From directly in front, the light reads as a bright rectangle with a firm border. From the side, an additional glowing face appears. This makes the fixture relevant to a gate that is approached from more than one direction, though the actual distribution of light onto the ground requires technical data.
To compare other cap-mounted proportions, browse post cap lights. The roof, illuminated body, and mounting base should all be considered when deciding what fits a specific pillar.
Measure the Cap Before Choosing the Fixture
Start with the pillar's finished top surface. Measure the flat area inside any bevel or raised edge, then compare it with the product's listed mounting base and overall roof dimensions. The photograph shows a generous stone cap, but perspective does not provide a reliable size. Check for gate hardware, an intercom, exposed wiring, or a sloped coping surface that would change where the light can sit.
A paper outline can answer many scale questions before installation. Cut two templates: one for the roof and one for the base. Place them on the cap and stand at the primary approach. If the roof visually overwhelms the pier or the base lacks adequate bearing area, review another size or design. Perform the same check on both sides of a gate because caps that look identical may differ in finished dimensions.
Design tip: align the light with the visible masonry face and gate opening, not automatically with an uneven cap overhang. A small adjustment to the proposed center can make a pair look balanced from the street. The final position must still satisfy the mounting instructions and provide appropriate support.
One Pillar, Two Pillars, or a Repeated Wall?
A matching pair usually makes sense when two pillars frame a residential driveway or pedestrian gate. One fixture can identify a single corner pier or short garden entrance. Along a long boundary wall, repeating the same low form on selected piers creates a visual route, but placing a light on every post may make the frontage too bright. Let the gate and key changes in direction set the rhythm.
At a Residential Gate
Use the fixtures to mark where vehicles or guests should enter. From the road, check whether the lit faces remain visible behind open gate leaves or mature planting. If a keypad sits on one pier, its position may require separate task lighting and may affect where that fixture can be centered.
At a Courtyard or Garden Opening
A single low lantern-like form can sit on a broad wall terminal and signal the start of a path. Keep it visually related to the paving or adjacent fence. If the route includes steps, check them independently; the glowing panels alone do not establish enough illumination on a change in level.
For a Commercial or Multifamily Entrance
Repeated cap lights can help guests read a sequence of gates or courtyard sections. Coordinate their locations with access controls, address signs, and the required lighting plan. A designer can use the compact profile to preserve views across a low wall while providing recognizable markers at entrances.
For other masonry-top forms and sizes, explore outdoor pillar lights and compare how much of each fixture rises above the cap.
How Does the Glow Affect the Entrance?
The luminous faces make the pillar readable from several angles and give the stone a nearby warm-looking accent. Because the roof and base remain dark, the bright center does not appear to float without support. The fixture is best understood as an entrance marker and ambient source until its output and beam information are confirmed. A long driveway, keypad, steps, or pedestrian path may need additional light.
Lighting tip: assess the view from the position where a driver stops. A panel that feels gentle from across a yard can be conspicuous at close range if it sits near eye level. Check sightlines toward the gate latch and road, and review the selected light output rather than judging brightness solely from a staged image.
Materials and Finishes Around the Pillar
The image pairs a black-looking frame and pale illuminated panels with rough gray stone. On dark brick, the glowing center may provide stronger contrast; on cream stucco, the corner uprights and horizontal bands will define the outline. A simple square fence or dark gate frame can echo the same geometry. Avoid assuming that the panels are glass or that the frame is a particular metal based on appearance alone.
If the project needs light farther along the approach, the broader outdoor lighting collection offers formats for walls, paths, and open areas. Plan those sources around specific activities instead of expecting a pillar-top fixture to light the entire property.
Is This Pillar-Top Light Right for Your Site?
This design suits a broad, level pillar cap and an entrance that benefits from a compact geometric light. Its wide roof and shallow body are useful where a tall post would compete with the architecture or block a view. A narrow pier, irregular sloped stone, or cap crowded by gate controls may require a smaller fixture or a different placement. Measure carefully before selecting the final variant.
- Confirm fit: compare the roof width, base footprint, and total height with the finished cap.
- Check exposure: verify the stated environmental rating for the chosen open or sheltered location.
- Review performance: confirm output, light color, power requirements, and controls against the intended use.
- Plan mounting: have the cap support, fixing method, wiring exit, and sealing reviewed for the exact installation.
- Allow access: ensure the panels and roof can be cleaned without damaging the masonry or gate.
Frequently Asked Questions
These answers address common placement and purchase questions for the pictured low, square fixture. Current specifications determine its technical suitability.
How wide should the pillar cap be?
It needs enough usable flat area for the product's actual mounting base and the installation clearance specified by the manufacturer. Measure inside any beveled or raised edge. Compare the overall roof width separately to judge the visual overhang; the image cannot supply reliable dimensions.
Can I mount one light on each gate pillar?
Yes, if both caps can support the same fixture and the positions remain clear of gate hardware. Measure each pier rather than assuming they match. Use temporary templates to check balance from the main approach, then verify the wiring and mounting arrangement with an installer.
Does the light shine down onto the driveway?
The panels visibly glow on the sides, but the image does not establish how much light reaches the ground. Check the product's stated output and distribution. If vehicles must navigate a narrow entrance or people need to read a keypad, consider separate light for those tasks.
Are the panels glass and the frame metal?
The photo shows pale light-transmitting panels and a dark frame, but it cannot confirm their composition. Consult the material specification and care instructions, particularly if weight, cleaning, or exposure to weather is a deciding factor.
Can it sit on a sloped stone cap?
A stable, correctly oriented base is needed. Whether the product can be mounted on a sloped surface depends on its instructions and the condition of the masonry. Ask a qualified installer to assess support, leveling, cable routing, and sealing rather than assuming the staged flat-cap arrangement applies.
Will this compact style work on a tall pillar?
It can, but the fixture's apparent size changes with viewing distance and the pillar's mass. Tape the roof and base outlines to the cap and review them from the street. A taller or wider pier may need a larger option to keep the top from looking visually undersized.


